Exploring Nutrient-Packed Ingredients for Vibrant Sandwich spreads
Wholesome sandwich spreads are a delightful way to infuse your daily meals with nutrients, flavour, and vivid colors that awaken the palate. Drawing inspiration from Mediterranean and Middle Eastern flavors, these spreads bring together a blend of hearty legumes, fresh herbs, and creamy natural elements that transform any sandwich into a healthful masterpiece. Whether you’re craving a zesty hummus variation or a lush avocado-tahini blend, using these nutrient-dense ingredients ensures every bite is both satisfying and nourishing.
prep and Cook Time
- Planning Time: 10 minutes
- Cook Time: 0 minutes (mostly no-cook spreads)
- Total Time: 10 minutes
Yield
- Approximately 1 cup of spread (serves 4 sandwiches)
Difficulty Level
- easy – Perfect for beginners and seasoned cooks seeking fast, wholesome upgrades
Ingredients
- 1 cup canned chickpeas, rinsed and drained
- 1 ripe avocado, peeled and pitted
- 1/4 cup tahini (sesame seed paste)
- 2 tablespoons fresh lemon juice
- 2 cloves garlic, minced
- 2 tablespoons extra-virgin olive oil
- 1/4 cup fresh parsley, chopped
- 1/2 teaspoon ground cumin
- 1/4 teaspoon smoked paprika
- Salt and freshly ground black pepper, to taste
- Optional: 1 tablespoon water, to adjust creaminess
Instructions
- Combine chickpeas, avocado, and tahini in a food processor or blender. Pulse several times until you reach a coarse paste.
- Add lemon juice, garlic, olive oil, parsley, cumin, and smoked paprika. Blend again until smooth and creamy. If the spread feels too thick, add water a teaspoon at a time and blend until desired texture is achieved.
- Season generously with salt and pepper,then pulse once more to incorporate seasoning evenly.
- Transfer to a serving bowl and drizzle with a little extra olive oil and a sprinkle of paprika or fresh parsley for a visual pop.
- Refrigerate for at least 30 minutes to allow flavors to meld beautifully, or serve promptly if short on time.
Tips for success
- For extra creaminess, ensure your avocado is perfectly ripe-soft but not mushy.
- Use fresh garlic for the brightest flavor; if sensitive to raw garlic, roast cloves for a milder profile.
- Acidity balance: Lemon juice not only adds zing but helps brighten the creamy texture-adjust depending on your taste.
- Make ahead: This spread keeps well covered in the fridge for up to 3 days. Stir again before serving as separation may occur.
- Variations: swap parsley for cilantro or basil for a different herbal note, or add a pinch of cayenne for heat.
Serving Suggestions
Spread generously on freshly toasted wholegrain bread or crisp pita pockets.Pair with crunchy cucumber slices, ripe tomato, or peppery arugula for contrast. Garnish with a sprinkle of toasted sesame seeds or a light drizzle of chili oil for a gourmet finish. For a fun twist, serve alongside crudité or as a creamy dip for baked vegetable chips.
| Nutrient | Per Serving (¼ cup) |
|---|---|
| Calories | 140 |
| Protein | 5g |
| Carbohydrates | 12g |
| Total Fat | 9g |
For more inspiration on nourishing meals, explore our guide on Healthy Lunch Ideas or discover the nutritional benefits of chickpeas at Healthline.

Q&A
Q&A: Wholesome Sandwich Spreads – Healthy Twists to Savor
Q1: What makes a sandwich spread “wholesome” and healthy?
A1: A wholesome sandwich spread focuses on nutrient-dense, natural ingredients that offer flavor without excessive processed fats, sugars, or artificial additives.think vibrant vegetables, protein-rich legumes, healthy fats from nuts or seeds, and flavorful herbs and spices that boost both taste and nutrition.
Q2: Can you suggest some delicious yet healthy base ingredients for sandwich spreads?
A2: Absolutely! Mashed avocado, Greek yogurt, hummus, nut butters (almond or cashew), and pureed white beans are stellar bases. Each adds creamy texture along with proteins, fiber, or heart-healthy fats to keep your sandwich satisfying and nourishing.
Q3: How can I give a classic mayo-based sandwich spread a healthy makeover?
A3: Swap out traditional mayonnaise for Greek yogurt or a blend of mashed avocado and a touch of olive oil. Add fresh herbs like dill, basil, or chives plus a squeeze of lemon juice for brightness. This approach slashes saturated fat and amps up the vitamin content while maintaining creaminess.
Q4: Are there any creative vegetable-based spreads that bring both flavor and nutrition?
A4: Yes! roasted red pepper and walnut spread, beetroot and garlic hummus, or carrot and ginger purée are flavorful options packed with antioxidants and fiber. Roasting vegetables first deepens their natural sweetness, making the spread a delightful balance of savory and subtle sweetness.
Q5: How do legume-based spreads contribute to a healthy sandwich?
A5: Legume spreads,such as chickpea hummus or black bean dip,add plant-powered protein and fiber,which support sustained energy and digestive health. They’re also incredibly versatile-infused with spices or citrus, they brighten up any sandwich with layers of flavor.Q6: Are nut and seed butters good spreads for sandwiches, and which ones do you recommend?
A6: Definitely! Nut and seed butters bring healthy monounsaturated fats and a satisfying richness to sandwiches. Almond butter, tahini (sesame seed paste), sunflower seed butter, or even pumpkin seed butter offer distinct tastes and nutrients, perfect for pairing with fruits, veggies, or whole grains.
Q7: What role do herbs and spices play in enhancing wholesome spreads?
A7: Herbs and spices are the secret superheroes of flavor without added salt or sugar. Fresh basil, cilantro, parsley, smoked paprika, cumin, or turmeric can transform simple ingredients into complex, palate-pleasing spreads bursting with antioxidants and anti-inflammatory properties.
Q8: can these healthy spreads accommodate various dietary restrictions?
A8: Yes! Most wholesome spreads can be adapted for vegan, gluten-free, or dairy-free diets by choosing plant-based bases and ensuring cross-contamination is avoided. The versatility of ingredients like beans, nuts, seeds, and fresh produce makes it easier then ever to craft spreads that fit your lifestyle and preferences.Q9: How can I incorporate these spreads into meals beyond just sandwiches?
A9: These nutritious spreads double as vibrant dips for fresh veggies, flavorful toppings for grain bowls, or sandwich enhancers on wraps and crackers. Experiment with using them as a base for open-faced toasts or dollops on warm baked potatoes-the possibilities are endless.
Q10: What’s a simple starter recipe for a wholesome sandwich spread I can try at home?
A10: Try this quick avocado and herb spread: mash one ripe avocado with a tablespoon of Greek yogurt, a teaspoon of lemon juice, a pinch of salt, and finely chopped fresh parsley and chives. Spread generously on whole-grain bread and layer with crisp cucumber and tomato for a fresh, nutritious lunch.
to sum up
As you embark on your next sandwich adventure, remember that wholesome spreads are more than just a layer between bread-they’re a canvas for nutrition and flavor to unite. By embracing these healthy twists, you not only elevate your meal but also nourish your body with every bite. so go ahead, experiment with vibrant ingredients, savor the textures, and transform your ordinary sandwich into a delightful festivity of wholesome goodness. After all, the best spreads don’t just enhance taste-they enrich your well-being, one flavorful dollop at a time.
Healthy Batch Cooking Ideas for Easy, Nutritious Meals bring a transformative approach to modern living, enabling you to save time, eat well, and nurture your body throughout the week without stress. Batch cooking, when centered around vibrant, nutrient-dense ingredients, empowers you to make wholesome choices effortlessly while keeping flavors bold and exciting.
Understanding the Benefits of Batch Cooking for a Balanced Lifestyle
Investing a few hours into batch cooking can unlock unbelievable benefits that ripple throughout your days. By preparing meals in advance, you reduce daily decision fatigue, avoid unhealthy last-minute options, and create a steady rhythm for balanced nutrition. It’s not just about convenience – it’s about setting yourself up for success with consistency and mindful eating.
Batch cooking also helps minimize food waste by using seasonal, fresh produce creatively and efficiently.Choosing vibrant veggies, whole grains, lean proteins like chicken breast or chickpeas, and heart-healthy fats ensures every batch is packed with the nutrients your body craves.
Choosing Nutrient-Dense Ingredients to Maximize Health
Key to thriving with batch cooking is selecting ingredients that sustain energy and promote overall well-being. Focus on colorful vegetables such as bell peppers, spinach, and sweet potatoes to provide fiber, antioxidants, and vitamins. Whole grains like quinoa or brown rice contribute sustained fuel, while plant-based proteins-including lentils and black beans-boost muscle repair and satiety without heaviness.
Healthy fats from sources like avocado, nuts, and extra-virgin olive oil add depth and richness, supporting brain and heart health. Incorporating fresh herbs and warming spices not only amplifies flavor but also introduces an anti-inflammatory edge, elevating simple meals into nourishing feasts.
Creative Meal Prep Strategies for Flavorful Batch Cooking
batch cooking doesn’t have to mean repetition or bland trays of food-let your creativity shine! Try layering your meals with different textures and complementary flavors. Such as, roast a medley of root vegetables while simmering a richly spiced lentil stew. Combine these components when serving for a balance of warmth, crunch, and freshness.
Utilize versatile dressings and sauces made ahead-like tahini-lemon dressing or a tangy tomato chutney-to revive meals and keep your palate excited. Incorporate contrasting elements like crunchy toasted seeds or a fresh herb garnish just before eating to preserve texture and vibrancy.
smart Storage and Reheating Tips to Preserve Nutrition and Taste
Proper storage is critical to maintain both flavor and nutrition. Use airtight containers made from glass or BPA-free plastic to keep foods fresh. Portion meals into individual servings so reheating is speedy and precise, reducing unneeded exposure to heat.
When reheating, opt for gentle methods like stovetop warming or oven reheating at low temperatures to protect sensitive vitamins and textures. Avoid the microwave when possible, or use it sparingly with brief intervals and stirring between cycles. Adding a splash of water or broth during reheating helps keep ingredients moist and inviting.
Prep and Cook Time
- Prep Time: 20 minutes
- Cook Time: 40 minutes
Yield
Serves 6 wholesome meals
Difficulty Level
Easy – perfect for beginners and busy weeknights
Ingredients
- 2 cups quinoa, rinsed
- 4 cups low-sodium vegetable broth
- 1 large sweet potato, peeled and diced
- 1 red bell pepper, chopped
- 2 cups fresh spinach, roughly chopped
- 1 can (15 oz) black beans, drained and rinsed
- 1 medium red onion, diced
- 3 cloves garlic, minced
- 2 tbsp extra-virgin olive oil
- 1 tsp smoked paprika
- 1/2 tsp ground cumin
- Salt and freshly ground black pepper, to taste
- Juice of 1 lemon
- 1/4 cup chopped fresh cilantro
- 1/4 cup toasted pumpkin seeds (optional)
Instructions
- Cook the quinoa: In a medium pot, bring the vegetable broth to a boil. Add the rinsed quinoa, reduce heat to low, cover, and simmer until liquid is absorbed, about 15 minutes. Fluff with a fork and set aside.
- Prepare the vegetables: While the quinoa cooks, heat 1 tablespoon of olive oil in a large skillet over medium heat. Add the diced onion and garlic, sauté until fragrant and translucent, about 3-4 minutes.
- Add diced sweet potato and red bell pepper: Stir in the vegetables, smoked paprika, cumin, salt, and pepper. Cover and cook, stirring occasionally, until sweet potato is tender but firm, about 10-12 minutes.
- Mix in black beans and spinach: Add rinsed beans and spinach to the skillet, cook until spinach wilts, about 2 minutes. Remove from heat and stir in lemon juice and fresh cilantro for brightness.
- Combine quinoa and vegetables: Transfer the quinoa to a large mixing bowl and fold in the vegetable mixture gently but thoroughly to integrate flavors.
- Portion and garnish: Divide meals into airtight containers. Sprinkle with toasted pumpkin seeds just before serving to add a satisfying crunch.
Chef’s Notes
- Swap quinoa for brown rice or farro for a heartier texture.
- Add roasted chickpeas or grilled chicken breast for extra protein boost.
- Prep the entire dish up to 4 days ahead; keep pumpkin seeds separate to maintain crunch.
- For extra zest, toss in a pinch of red pepper flakes or a drizzle of tahini before serving.
- If reheating, cover containers loosely to retain moisture and reheat gently on stovetop or oven.
Serving Suggestions
Serve warm topped with fresh avocado slices and a squeeze of lime for creaminess and zing. A crisp side salad or steamed greens complements this dish beautifully.Garnish with additional herbs like parsley or mint to brighten and refresh.

| Nutrient | Per Serving |
|---|---|
| Calories | 350 kcal |
| Protein | 12 g |
| Carbohydrates | 50 g |
| Fat | 8 g |
Discover more wholesome meal prep inspiration and nutrition insights in our Meal Prep Nutrition guide. For detailed research on nutrient retention during reheating, visit British Nutrition Foundation.
Q&A
Q&A: Healthy Batch Cooking Ideas for Easy, Nutritious Meals
Q1: what is batch cooking and why is it beneficial for a healthy lifestyle?
A: Batch cooking is the practice of preparing multiple servings of meals or ingredients in one go, usually at the start of the week.This approach saves time,reduces stress around mealtime,and helps maintain a healthy diet by having nutritious,homemade options ready to go. It also minimizes food waste and encourages portion control-key ingredients for a balanced lifestyle.Q2: How can I start batch cooking if I’m a beginner?
A: Begin by choosing simple recipes with overlapping ingredients,like roasted vegetables,grains,and proteins such as chicken,lentils,or tofu.Pick two or three meals to prepare that can share components. For instance, cook a big batch of quinoa and use it for a salad, a bowl, or a stir-fry. Invest in good storage containers to keep your meals fresh and organized.
Q3: What are some healthy protein options for batch cooking?
A: Lean proteins like chicken breast, turkey, fish, legumes (beans, lentils, chickpeas), tofu, tempeh, and eggs work brilliantly in batch cooking. These ingredients provide sustained energy and can be flavored in numerous ways to keep meals exciting throughout the week.
Q4: Which vegetables are best suited for batch cooking?
A: Vegetables that hold up well when cooked in advance include carrots, broccoli, cauliflower, bell peppers, sweet potatoes, zucchini, and leafy greens like kale or spinach (added fresh or lightly sautéed before eating). Roasting, steaming, or sautéing these veggies enhances thier flavor and texture, making them perfect for reheating or eating cold in salads.
Q5: can grains be batch cooked, and how do I keep them fresh?
A: Absolutely! Grains like brown rice, quinoa, bulgur, barley, and farro are excellent batch cooking staples.Cook them in bulk, portion into airtight containers, and store in the fridge for up to 4-5 days or freeze in smaller bags for longer storage. When reheating,add a splash of water to restore moisture.Q6: How do I make sure my batch-cooked meals stay nutritious and not bland?
A: Flavor is key! Experiment with herbs,spices,citrus juices,vinegars,and condiments like mustard or tahini. Layer flavors during cooking-think garlic and ginger in stir-fries or smoked paprika and cumin for roasted veggies. Keeping a variety of seasonings on hand can transform simple ingredients into vibrant meals.
Q7: What are some creative batch cooking meal ideas that combine nutrition and ease?
A: Try these:
- Mediterranean grain bowl: quinoa, roasted chickpeas, cucumbers, tomatoes, olives, and a lemon-tahini dressing.
- Veggie-packed chili: Mixed beans, tomatoes, bell peppers, corn, and spices slow-cooked and portioned into containers.
- Sheet pan chicken with root vegetables: Chicken breasts, sweet potatoes, carrots, and Brussels sprouts roasted with rosemary and garlic.
- Tofu stir-fry: Marinated tofu with broccoli, snap peas, and brown rice tossed in a ginger-soy glaze.
- Lentil salad: Cooked lentils mixed with diced vegetables, fresh herbs, and a tangy vinaigrette.
Q8: How can batch cooking help with portion control and mindful eating?
A: Having pre-portioned meals ready means you’re less likely to overeat or grab unhealthy snacks when you’re hungry. It encourages mindful eating because you’ve planned balanced meals in advance and reduces spontaneous, last-minute food decisions that might not align with your health goals.
Q9: Any tips for storing and reheating batch-cooked meals to maintain quality?
A: Cool meals quickly before refrigerating to preserve freshness. Use airtight containers to prevent odor transfer and moisture loss. When reheating, add moisture like broth or water if dishes feel dry. Some meals taste better reheated gently on the stovetop or oven rather than the microwave to preserve texture.
Q10: How do I keep batch cooking lasting and avoid boredom?
A: Rotate your favorite dishes and try new flavor profiles every week-explore different cuisines like Mediterranean, Asian, or Middle Eastern for inspiration. Swap out ingredients seasonally for freshness, and don’t be afraid to repurpose leftovers into new meals, such as turning a grain bowl into a stuffed pepper or a salad wrap.
Batch cooking is a gateway to nourishing your body while simplifying your schedule-allowing you more time to savor your meals and the moments they fuel!
Future outlook
Batch cooking isn’t just a time-saver-it’s a game-changer for anyone eager to nourish their body without the daily scramble. By dedicating a little time upfront,you create a personalized pantry of wholesome meals that fuel your week with ease and flavor. Whether you’re a busy professional, a parent on the go, or simply someone who values health and simplicity, these batch cooking ideas can transform your relationship with food.So grab your favorite casseroles, storage containers, and spices, and start crafting a kitchen rhythm that works for you. Here’s to eating well, living fully, and savoring every bite-one batch at a time.
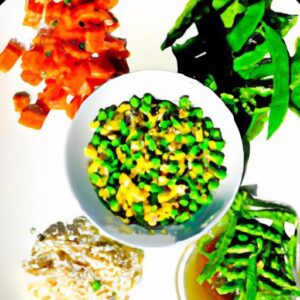
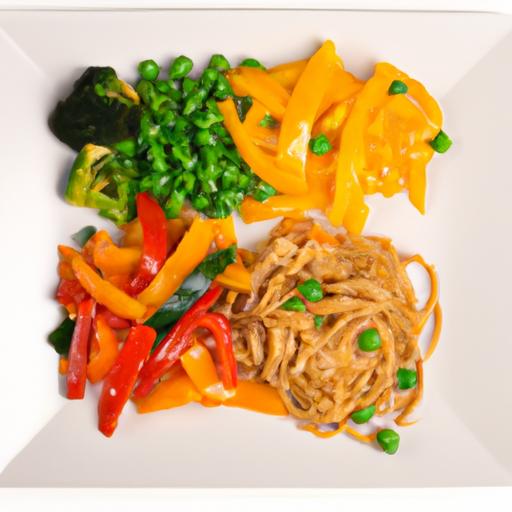
Veggie Superhero Platter: Power-Packed Healthy Bites invites you on a vibrant journey of nutrition and texture. This colorful combination is carefully crafted to awaken your palate and energize your body with every crunchy, nutrient-rich morsel. Bringing together a spectrum of garden-fresh vegetables, each bite is a mini celebration of nature’s most powerful vitamins, minerals, and antioxidants. Whether you’re entertaining guests or fueling a busy day, this platter boosts energy levels while rewarding your senses with exciting flavors and satisfying crunch.
Prep and Cook Time
planning: 25 minutes
Cooking: 0 minutes (no cooking required)
total Time: 25 minutes
Yield

Serves 4-6 as a hearty appetizer or energizing snack
Difficulty Level
Easy – perfect for beginners or anyone short on time
Ingredients
- 1 cup luminous orange baby carrots, peeled
- 1 cup crisp rainbow bell peppers, sliced into thin strips
- 1 cup crunchy celery sticks, cut into 3-inch lengths
- 1 cup cherry tomatoes, halved
- 1 cup purple cauliflower florets, bite-sized
- 1 cup cucumber slices, peeled and thinly cut
- 1 ripe avocado, diced (for garnish and creaminess)
- 2 tbsp toasted pumpkin seeds (pepitas)
- Fresh herbs: handful of chopped parsley and cilantro
- Sea salt and freshly ground black pepper, to taste
Flavor-Packed Dips and Dressings
- Wholesome Lemon-Tahini Dip:
- ½ cup creamy tahini
- 3 tbsp fresh lemon juice
- 1 garlic clove, minced
- ¼ tsp smoked paprika
- Water, to thin as needed
- Pinch of sea salt
- Herb & Yogurt Ranch:
- ½ cup plain Greek yogurt
- 1 tbsp fresh dill, finely chopped
- 1 tbsp chives, chopped
- 1 tsp apple cider vinegar
- Salt and pepper to taste
Instructions
- Wash and Prep Veggies: Rinse all vegetables thoroughly under cold water. Pat dry with paper towels to ensure crispness. Peel baby carrots if needed and slice bell peppers and cucumbers into uniform sticks for ease of dipping.
- Arrange Your Platter: on a large serving board or platter, artistically arrange each vegetable type in vibrant groups, alternating colors for visual appeal. Scatter cherry tomatoes and purple cauliflower florets evenly to add bursts of color and texture.
- Mix the Lemon-Tahini Dip: In a small bowl, whisk together tahini, lemon juice, minced garlic, smoked paprika, and sea salt. Add water gradually to reach a smooth, pourable consistency. Adjust seasoning as preferred.
- Prepare the Herb yogurt Dip: Combine Greek yogurt, dill, chives, apple cider vinegar, salt, and pepper in another bowl. Mix well until the flavors are well melded. Chill briefly to enhance flavors if time allows.
- Garnish your Platter: Sprinkle diced avocado and toasted pumpkin seeds over the veggies for final texture and richness. Finish with a light dusting of fresh parsley and cilantro to amplify aroma and freshness.
- Serve Immediately: Present the dips in small bowls placed strategically around the platter. Encourage guests to enjoy this rainbow of veggies paired with the creamy, zesty dips for a truly energizing bite.
Tips for Fresh Prep and Smart Storage
- Keep Veggies Crisp: Store pre-cut vegetables in airtight containers lined with damp paper towels to retain moisture without sogginess.
- Dips Stay Fresh Longer: store dips separately in sealed jars to maintain their bright flavors. Fresh lemon juice in the tahini dip prevents bitterness.
- Assemble Just Before Serving: For maximum crunch and visual appeal, prep ingredients in advance but assemble the platter right before guests arrive.
- Batch Roast Optional Add-Ons: Roasted chickpeas or spiced nuts can be prepared ahead and added to the platter for a protein boost.
Chef’s Notes
Swap out any veggies for seasonal favorites like snap peas, sugar snap peas, or radishes to keep the platter exciting and fresh throughout the year. For a vegan option, replace Greek yogurt with coconut cream or cashew-based yogurt. When selecting avocado, choose firm yet ripe fruit to avoid mushiness, ensuring a splash of smooth texture against the crisp bites. Remember, this Veggie Superhero Platter: Power-Packed Healthy Bites shines brightest when you celebrate freshness, vibrant colors, and contrasting textures in every element.
Serving Suggestions
This platter pairs beautifully with a rustic whole-grain baguette or crisp flatbreads for added substance. Add a small bowl of mixed olives or pickled veggies to enhance the Mediterranean vibe. Garnish with edible flowers like nasturtiums or pansies to impress guests visually while adding subtle peppery notes. Invite guests to create their own mini veggie wraps using collard greens or butter lettuce leaves for a fun, interactive experience.
| Nutrient | Per Serving |
|---|---|
| Calories | 150 kcal |
| Protein | 4 g |
| Carbohydrates | 20 g |
| Fat | 7 g |

For a deeper dive into plant-based energy boosters, check out our ultimate Guide to Plant-Based Energy. To explore the science behind nutrient absorption from vegetables, visit this Healthline article on food combinations.
Q&A
Q&A: Veggie Superhero Platter: Power-Packed Healthy Bites
Q1: what is a Veggie Superhero Platter?
A Veggie Superhero Platter is a vibrant, nutrient-rich assortment of colorful vegetables and plant-based bites, carefully curated to fuel your body with super-strength vitamins, minerals, and antioxidants. Think of it as your personal team of healthy heroes,assembled to boost energy,immunity,and overall wellness.
Q2: Why call it a “superhero” platter?
Just like superheroes have unique powers, each veggie on this platter brings its own special health benefits. From the immune-boosting vitamin C in red peppers to the cancer-fighting antioxidants in broccoli, this platter is packed with powerhouse ingredients ready to battle fatigue, inflammation, and nutrient gaps.
Q3: What veggies make the best “superhero” players on the platter?
Vibrant, nutrient-dense veggies like cherry tomatoes, baby carrots, broccoli florets, crunchy celery sticks, bell peppers in reds, yellows, and greens, snap peas, and colorful radishes are top contenders. Add roasted chickpeas or stuffed mini peppers for an extra punch!
Q4: Can this platter be made ahead for a crowd?
Absolutely! The beauty of the Veggie Superhero Platter is its versatility and ease. Prepare your veggies in advance, store them in airtight containers, and assemble the platter just before serving. Keep dips chilled and add them fresh to maintain maximum crunch and flavor.
Q5: What are some power-packed dips to accompany the platter?
Dips that add flavor and nutrition include hummus (classic or flavored with beetroot or roasted red pepper), creamy avocado dip, tangy tahini lemon sauce, or a spicy black bean dip. These dips complement the veggies while adding protein and healthy fats to keep you energized.
Q6: How does this platter support a healthy lifestyle?
With every bite, you’re nourishing your body with fiber for digestion, antioxidants for cell health, and essential vitamins and minerals that keep your immune system strong.It’s a guilt-free snack that satisfies cravings, energizes your day, and supports weight management.
Q7: Is the Veggie Superhero Platter kid-kind?
Definitely! Children love colorful foods arranged like a fun team of superheroes. To boost appeal, include sweet baby carrots, crunchy cucumber slices, and colorful bell pepper sticks. Pair with kid-approved dips like mild hummus or creamy yogurt-based dressings.
Q8: Can this platter be made vegan and gluten-free?
Yes! The Veggie Superhero Platter is naturally vegan and gluten-free. All ingredients are plant-based and free from gluten,making it perfect for diverse dietary choices without sacrificing taste or nutrition.
Q9: How can I make the platter more filling without losing its health edge?
Incorporate protein-rich bites like baked falafel balls, roasted chickpeas, or edamame pods. You can also add small portions of nut-based cheeses or sprinkle seeds like pumpkin or hemp seeds for extra texture, flavor, and satiety.
Q10: What’s a fun way to present the Veggie Superhero Platter for gatherings?
Arrange your veggies and dips in vibrant sections or shapes-like a rainbow or superhero emblem! Label each veggie with a little ”superpower” tag, such as “Vitamin C shield” or “Fiber Flash,” to engage guests in a playful and educational way.
Power up your plate, and let your Veggie superhero Platter save the day-one healthy, delicious bite at a time!
The Conclusion
As you embark on your journey toward vibrant health, the Veggie Superhero Platter stands ready to fuel your day with nature’s finest powers. Each colorful bite is more than just a snack-it’s a delicious alliance of nutrients designed to energize, protect, and uplift your body. Whether you’re seeking a swift boost or a wholesome meal, this platter proves that healthy eating can be both fun and superhero-worthy. So go ahead, assemble your own veggie squad and unleash the power-packed benefits that only Mother Nature’s heroes can provide. Your body will thank you, and your taste buds will cheer for more!
The Science Behind Air-Popped Popcorn’s Health Benefits
Air-popped popcorn is not only a delicious, satisfying snack but a powerhouse of nutrition that keeps guilt miles away. Originating from ancient civilizations where corn was treasured not just for sustenance but for ceremonial purposes, this modern-day snack remains a favorite due to how effortlessly it balances flavor and health.
Popcorn’s unique ability to expand into fluffy kernels without the need for oil or added fats is the secret behind its crunchy texture and low-calorie appeal. When popcorn kernels pop, the starch inside gelatinizes and inflates, creating a light, airy bite that’s naturally high in dietary fiber and antioxidants, such as polyphenols. These compounds support heart health, aid digestion, and help regulate blood sugar.
Prep and Cook Time
- Preparation: 2 minutes
- Cooking: 4 minutes
- Total Time: 6 minutes
Yield

Serves 4 (about 12 cups of air-popped popcorn)
Difficulty Level
Easy – Perfect for beginners and snack pros alike.
Ingredients
- 1/3 cup popcorn kernels (preferably organic,non-GMO)
- Sea salt,to taste
- 2 tablespoons nutritional yeast (optional,for cheesy flavor)
- 1 teaspoon smoked paprika (optional,for a smoky kick)
- 1 tablespoon extra virgin olive oil or avocado oil (optional,for coating toppings)
Instructions
- Prepare your air popper according to manufacturer instructions.If you’re using a microwave-safe bowl, make sure it has a vented lid.
- Add the popcorn kernels to your air popper. Ensure the kernels are evenly spread so they pop efficiently.
- Start the air popper and carefully catch the freshly popped kernels in a large bowl.
- In a small bowl,mix sea salt,nutritional yeast,and smoked paprika,adjusting the quantities to your liking for bold flavor without the guilt.
- Lightly drizzle olive or avocado oil over the warm popcorn while tossing gently to distribute the oil evenly-this helps the seasonings stick without excess calories.
- Sprinkle the seasoning blend over the popcorn and toss again until every kernel is bursting with flavor.
- Serve immediately for maximum freshness and crunch.
Tips for Success
- Kernel quality matters: use fresh,organic popcorn kernels for superior popping and flavor.
- Avoid steaming: After popping,spread popcorn on a baking sheet for a few minutes to release any trapped moisture and keep crispness.
- Customize boldly: Swap smoked paprika with cumin or chili powder for warmth, or add a pinch of cinnamon sugar for a sweet twist.
- Nutritional yeast is a fantastic dairy-free option that adds umami depth, perfect for vegan-friendly snacking.
- Make ahead: Keep popcorn in an airtight container to maintain freshness; season right before serving to prevent sogginess.
Serving Suggestions
Present your air-popped popcorn in a bright, festive bowl garnished with finely chopped fresh herbs such as rosemary or thyme for an herbal pop. Pair with a chilled glass of sparkling water infused with lemon and cucumber for a refreshing, balanced snack experience. For a party twist,consider topping with toasted nuts or seeds for added texture and protein.
| Nutrient | Per Serving (3 cups) |
|---|---|
| Calories | 93 |
| Protein | 3 g |
| Carbohydrates | 18 g |
| Fat | 1 g |
| Fiber | 3.5 g |
Unlocking Bold Flavors without the Guilt with air-Popped Popcorn
Air-popped popcorn invites endless creative possibilities, allowing you to enjoy snacks rich in taste and health benefits simultaneously. its neutral base makes it a fantastic canvas for both savory and sweet toppings-each biting into its airy crunch with bright bursts of flavor. Whether you crave classic sea salt, fiery chili blends, or even cinnamon maple sweetness, you can satisfy cravings with mindful nutrient-conscious choices.
Because it’s naturally low in calories and free from oil, air-popped popcorn embraces you with comfort in every bite. Boost it with antioxidant-rich spices or add a dusting of superfood powders like turmeric or spirulina to fuel wellness with vibrant colors and tastes.
Creative Toppings and Seasonings to Elevate Your Snack
- Spicy Za’atar Mix: Blend air-popped popcorn with za’atar, a blend of thyme, sumac, and toasted sesame seeds.
- Sweet Coconut & Cinnamon: Toss popcorn with unsweetened shredded coconut and a sprinkle of cinnamon.
- Garlic-Parmesan Herb: Use garlic powder, dried basil, and vegan Parmesan for an addictive flavor combo.
- Matcha Drizzle: Lightly dust popcorn with matcha powder mixed with a touch of powdered sugar for a sweet-green tea spin.
Smart Serving Tips for Maximum Enjoyment and Nutrition
To fully enjoy air-popped popcorn while preserving its health benefits and crunch, serve in wide, shallow bowls to avoid stewing. pair with raw vegetables or a fresh fruit platter to round out your snack nutrition. hydrate simultaneously-air-popped popcorn’s fiber content works best when balanced with plenty of water. Keep portion sizes moderate to avoid mindless munching and try using small lined bowls to measure servings visually and effortlessly.
For further inspiration on wholesome snacks, check out our Healthy Snacks Guide. Learn about the science-backed benefits of whole grains and fiber-rich snacks from trusted nutrition sources like the Harvard T.H. Chan School of Public Health.

Q&A
Q&A: Air-Popped Popcorn – A Healthy Snack with Big flavor Boost
Q1: What makes air-popped popcorn a healthier snack compared to traditional popcorn?
A1: Air-popped popcorn is made without oil or butter, dramatically cutting down on added fats and calories. This method preserves popcorn’s natural fiber and whole-grain goodness, making it a light yet satisfying treat that supports healthy digestion and sustained energy.
Q2: How does air-popped popcorn fit into a balanced diet?
A2: Popcorn is a whole grain packed with dietary fiber, which helps keep you fuller longer and aids in digestive health. As air-popped popcorn is low in calories and fat, it’s a guilt-free snack option that pairs well with a variety of nutrient-rich foods throughout the day.
Q3: Can air-popped popcorn be flavored without compromising its health benefits?
A3: Absolutely! You can add bursts of flavor while keeping it healthy by experimenting with spices like smoked paprika, nutritional yeast for a cheesy vibe, garlic powder, or a sprinkle of cinnamon and a dash of chili powder for sweetness and heat. Using heart-healthy herbs and spices boosts taste without adding calories or unhealthy fats.
Q4: Is air-popped popcorn suitable for people with dietary restrictions?
A4: Yes! Air-popped popcorn is naturally gluten-free and vegan, making it a versatile snack for many dietary needs. It’s a perfect choice for those avoiding dairy,gluten,or animal products,offering a crunchy,satisfying mouthfeel without allergens or additives.
Q5: What’s a creative way to enjoy air-popped popcorn beyond the bowl?
A5: Try tossing air-popped popcorn into salads for an unexpected crunch, mixing it with nuts and dried fruit for a wholesome trail mix, or using it as a topping for hearty soups. It’s a flavor-and-texture enhancer that turns ordinary dishes into exciting culinary experiences.
Q6: How easy is it to air-pop popcorn at home?
A6: Super easy! All you need is a dedicated air popper or a microwave-safe bowl with a vented lid.Pop kernels in just a few minutes without oil or butter, and you have fresh popcorn ready for your custom flavor creations-rapid, convenient, and far healthier than microwave bags loaded with additives.
Q7: Can air-popped popcorn help satisfy cravings for crunch or saltiness?
A7: Definitely! Because it’s light and airy, popcorn provides a satisfying crunch that can easily replace less healthy snacks like chips. A light sprinkle of sea salt or flavored seasoning can satisfy salty cravings without the overload of fat or preservatives found in many processed snacks.
In Summary
In a world where snack choices frequently enough tilt toward the indulgent or the overly processed, air-popped popcorn stands out as a beacon of balanced delight. Light, crunchy, and brimming with potential, this humble snack proves that healthy doesn’t have to mean flavorless. Whether you’re jazzing it up with a sprinkle of nutritional yeast, a dash of smoky paprika, or a hint of cinnamon and sugar, air-popped popcorn invites you to customize your snack time without compromise. So next time hunger calls, reach for a bowl of this guilt-free treat-a simple, satisfying way to enjoy big flavor with every bite. Your taste buds and your well-being will both thank you.

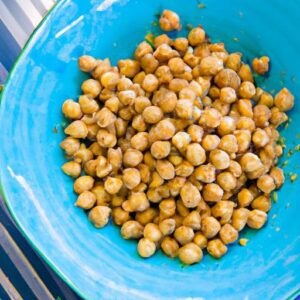
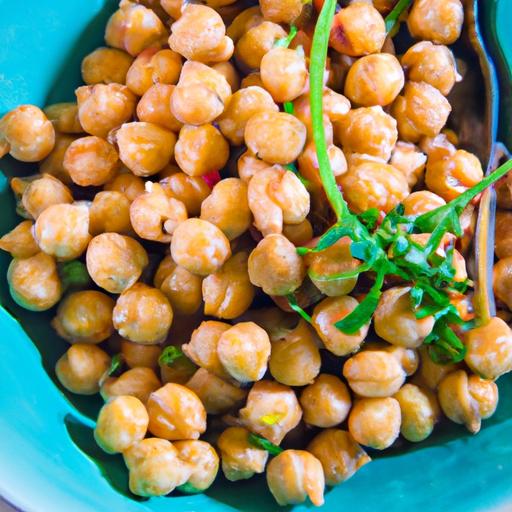
Crunchy crispy chickpeas have swiftly become my favorite guilt-free snack to enjoy any time of day. Originating from humble roots in Middle Eastern and Mediterranean cuisine, these little legumes offer a satisfying crunch and a rich, nutty flavor that’s incredibly versatile. What makes them truly special is their ability to deliver a hearty texture and protein punch while being low in fat and packed with fiber-perfect for those mindful moments when cravings strike without compromising health goals.
Prep and Cook Time
- Planning: 10 minutes
- cooking: 40 minutes
- Total time: 50 minutes
Yield
Approximately 3 cups (4 servings)
Difficulty Level
Easy
Ingredients
- 2 (15 oz) cans of chickpeas, drained and rinsed thoroughly
- 1 ½ tablespoons olive oil
- 1 teaspoon smoked paprika
- 1 teaspoon garlic powder
- ½ teaspoon ground cumin
- ½ teaspoon sea salt
- ¼ teaspoon black pepper
- Optional seasoning: pinch of cayenne pepper for heat or 1 teaspoon za’atar for a fragrant twist
Instructions
- Preheat your oven to 400°F (200°C). Lining a baking sheet with parchment paper ensures easy cleanup and keeps the chickpeas from sticking.
- After draining, gently pat the chickpeas dry with a clean kitchen towel or paper towels. Removing surface moisture is crucial to achieve that addictive crunch.
- Remove the lose skins by gently rolling the chickpeas between your hands. This step is optional but highly recommended to avoid sogginess.
- Transfer the dried chickpeas to a mixing bowl. Drizzle with olive oil and toss to coat evenly, ensuring every chickpea is glistening but not drenched.
- Add smoked paprika, garlic powder, cumin, salt, and pepper. Sprinkle the spices over the chickpeas, then toss again until fully combined and fragrant.
- Spread the chickpeas in a single layer across the baking sheet. Overcrowding will cause steaming instead of roasting, so use two sheets if necessary.
- Roast for 25-30 minutes, shaking the pan or stirring every 10 minutes for even browning. Roast until golden and crisp on the outside.
- At about 30 minutes, test the crunch of a chickpea. If still chewy, roast extra 5-10 minutes, watching closely to prevent burning.
- Remove from oven and let cool completely on the baking sheet. The chickpeas will continue to crisp as they cool.
- Store cooled chickpeas in an airtight container at room temperature for up to 5 days-if they last that long!
Tips for Success
- Use dried chickpeas: For an even crunchier texture, soak and cook dried chickpeas overnight for this recipe.Pre-cooked chickpeas often have a softer interior.
- Consistent roasting: Keep oven temperature steady and stir regularly to prevent burning and promote even crisping.
- Flavor variations: Swap smoked paprika for curry powder, chipotle chili, or lemon zest to keep snack time exciting.
- Make-ahead: Roast a large batch and portion into snack bags for grab-and-go nourishment throughout the week.
- Re-crisping: If chickpeas lose crunch after storage, pop them back in a hot oven at 375°F (190°C) for 5-7 minutes before serving.
Serving suggestions
Enjoy these crunchy crispy chickpeas straight from the container for a wholesome snack, or elevate the experience by sprinkling fresh chopped parsley and a squeeze of lemon juice. They also make a delightful topper for salads, grain bowls, and soups, adding a textural contrast that invigorates every bite. For a fun twist, toss with a handful of toasted coconut flakes or mix them into your favorite trail mix for an energizing afternoon pick-me-up.
| Nutrient | Per Serving (¾ cup) |
|---|---|
| Calories | 130 |
| Protein | 6g |
| Carbohydrates | 18g |
| Fat | 4g |

for more wholesome plant-based snack ideas, check out our Healthy snacks with Chickpeas article.To dive deeper into the nutritional benefits of chickpeas, visit the NutritionValue.org Chickpeas Profile.
Q&A
Q&A: Crunchy Crispy Chickpeas: A Healthy Snack You’ll Love
Q: What makes crunchy crispy chickpeas a great healthy snack?
A: Crunchy crispy chickpeas are packed with protein, fiber, and essential nutrients, making them a satisfying and nutritious choice to traditional snacks. Their crispy texture satisfies the craving for something crunchy without the added sugars or unhealthy fats often found in chips or cookies.
Q: How do you achieve that perfect crunch when roasting chickpeas?
A: The secret to that unbeatable crunch lies in thoroughly drying the chickpeas before roasting and tossing them with a little oil to help them crisp up evenly. roasting at a high temperature for just the right amount of time creates a golden, crunchy exterior while keeping the inside delightfully tender.
Q: Can I customize the flavors of crunchy crispy chickpeas?
A: Absolutely! Chickpeas are like little flavor sponges, ready to soak up spices, herbs, and seasonings. Whether you prefer smoky paprika, zesty lemon pepper, spicy chili, or a hint of garlic and rosemary, you can tailor your crispy chickpeas to match your taste buds or even your mood.
Q: Are crunchy crispy chickpeas suitable for all diets?
A: Yes! They are naturally vegan, gluten-free, and free from common allergens like nuts and dairy. Plus, they fit well within vegetarian, vegan, paleo, and whole-food plant-based diets, making them a versatile snack for almost everyone.
Q: How can crunchy crispy chickpeas contribute to weight management?
A: Thanks to their high protein and fiber content, roasted chickpeas help you feel fuller for longer periods. this can reduce overeating and help maintain steady energy levels, supporting healthy weight management as part of a balanced diet.
Q: What is the simplest way to make crunchy crispy chickpeas at home?
A: Start by rinsing and drying canned chickpeas thoroughly. Toss them with a bit of olive oil and your favorite seasonings,spread them evenly on a baking sheet,and roast at 400°F (around 200°C) for 30-40 minutes,shaking the pan occasionally to ensure even crispiness.
Q: Can crunchy crispy chickpeas replace less healthy snacks at gatherings or parties?
A: Definitely! Their appealing crunch and bold flavors make them a crowd-pleaser. Serve them in bowls or mix into salad toppings for an unexpected twist, offering guests a healthful and tasty option.
Q: How should I store crunchy crispy chickpeas to keep them fresh and crunchy?
A: Store them in an airtight container at room temperature. To maintain optimal crispiness, enjoy them within a few days. If they soften, a quick reheat in the oven for a few minutes can revive their crunch.
Q: Are crunchy crispy chickpeas a good source of energy for active individuals?
A: Yes! The combination of complex carbohydrates, protein, and fiber in chickpeas provides steady energy, making them an excellent pre- or post-workout snack to fuel your body and support muscle recovery.Q: Can kids enjoy crunchy crispy chickpeas as a snack?
A: Absolutely! Their fun crunch and customizable flavors make them a kid-pleasant snack that parents can feel good about. Just consider milder seasonings for younger taste buds and watch portion sizes to avoid overconsumption.
The way Forward
Whether you’re craving a guilt-free crunch or a protein-packed pick-me-up, crunchy crispy chickpeas deliver a snack experience that’s as satisfying as it is indeed nourishing.With their golden, crispy texture and versatile flavor, these little legumes prove that healthy eating doesn’t mean sacrificing taste. So next time hunger strikes, reach for a handful of these crunchy gems and enjoy a snack that’s truly love at first bite. Healthy, delicious, and irresistibly crispy-chickpeas are here to stay as your new favorite snack companion.
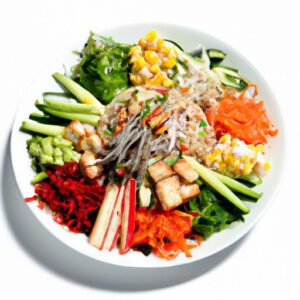
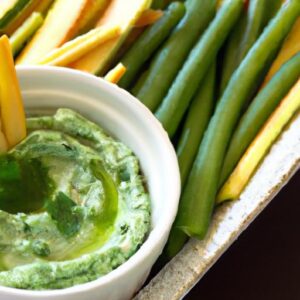
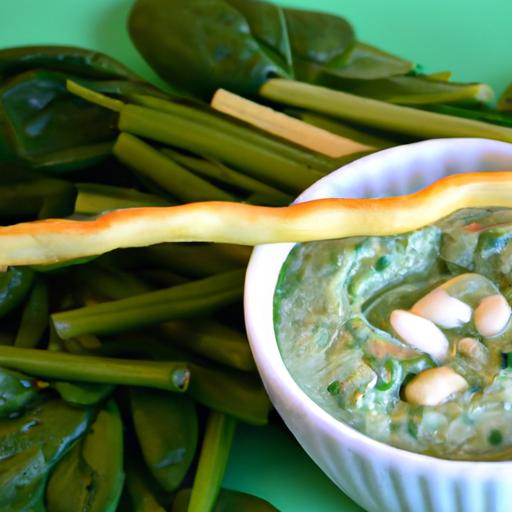
Benefits of Incorporating Spinach and White Beans into Your Snack Routine
Fresh & Healthy Spinach white Bean Dip with Veggie Sticks is not only a tasty treat but also a powerhouse of nutrition that supports your snacking goals. Combining the vibrant greens of spinach and the creamy richness of white beans creates a nutrient-dense dip that’s high in fiber, plant-based protein, and essential vitamins like iron and vitamin K. Adding this duo to your snack routine helps enhance digestion, promotes sustained energy, and supports muscle function, making it an ideal choice for those seeking a healthy, satisfying snack without compromising on taste.
White beans also bring antioxidants and minerals such as magnesium which are beneficial for heart health. Fresh spinach’s subtle earthy notes elevate this dip, giving it a vibrant green color that delights the eyes and palate alike. Whether you are prepping for a busy workday or hosting friends, this combo satisfies cravings with hearty nourishment.
Crafting the Perfect Creamy Texture with Fresh Ingredients
The magic of the Fresh & Healthy Spinach white Bean Dip with Veggie Sticks lies in achieving a luxuriously creamy texture while preserving freshness. Start by using freshly cooked (or canned, well-rinsed) white beans for a naturally smooth base. Fresh spinach should be lightly wilted or sautéed to soften bitterness without losing its vibrant green hue and nutrients.
Blending these together with a touch of extra virgin olive oil and a squeeze of fresh lemon juice amplifies the dip’s silkiness and adds a bright zing. For extra creaminess, consider incorporating a spoonful of tahini or a splash of unsweetened plant-based milk. The key is to pulse the ingredients in a food processor slowly, scraping the sides frequently to avoid over-processing and maintain a delightful, slightly textured consistency.
Choosing the Best Veggie sticks for Maximum Crunch and nutrition
Pairing the dip with crunchy vegetable sticks not only makes this snack visually appealing but also adds a satisfying contrast of texture. Opt for fresher,crispier veggies such as carrot sticks,cucumber spears,bell pepper strips,and jicama sticks to maximize crunch. Each brings unique nutritional benefits: carrots add beta-carotene, cucumbers offer hydration, bell peppers pack vitamin C, and jicama provides fiber and a slightly sweet bite.
For a more colorful platter,don’t shy away from purple or orange carrots,celery ribs,or even snap peas. the goal is to provide a robust bite that pairs perfectly with the creamy dip, creating a balanced snack that’s as nourishing as it is appetizing. Slice your veggies uniformly to ensure easy dipping and a neat presentation.
Tips for Storing and serving your Spinach White Bean Dip for Lasting Freshness
To preserve the Fresh & Healthy Spinach White Bean Dip with Veggie Sticks, store the dip in an airtight container and keep it refrigerated. A thin layer of olive oil spread on top before sealing helps prevent oxidative browning, keeping that gorgeous green hue intact. Properly stored, the dip can stay fresh for up to 4 days.
When ready to serve, stir the dip gently to revive its creamy texture and consider adding a last-minute drizzle of olive oil or a sprinkle of toasted pine nuts for added depth. Serve the dip chilled alongside an assortment of colorful veggie sticks arranged on a wooden board or ceramic dish for inviting appeal.
For enhanced freshness, keep veggie sticks in a shallow water bath, covered, in the fridge until serving time to maintain crispness. This attention to storage detail guarantees the ideal snacking experience every time.

Prep and Cook Time
- Preparation Time: 15 minutes
- Cooking Time: 5 minutes (to wilt spinach)
- Total Time: 20 minutes
Yield
Serves: 6
Difficulty Level
Easy
Ingredients
- 1 ½ cups cooked white beans (cannellini or great northern, rinsed and drained)
- 3 cups fresh baby spinach (lightly wilted)
- 2 tablespoons extra virgin olive oil
- 1 tablespoon fresh lemon juice
- 2 cloves garlic (minced)
- 1 teaspoon ground cumin
- ½ teaspoon sea salt (adjust to taste)
- ¼ teaspoon freshly ground black pepper
- Optional: 1 tablespoon tahini (for extra creaminess)
- Veggie sticks assortment: carrot, cucumber, bell pepper, celery, jicama
Instructions
- Wilt the spinach: Heat a non-stick skillet over medium heat. Add fresh baby spinach and sauté just until wilted, about 2 minutes.Remove from heat and let cool slightly.
- Prepare the dip base: In a food processor, combine cooked white beans, wilted spinach, minced garlic, lemon juice, cumin, salt, and pepper. Pulse gently to start blending.
- Add olive oil: With the food processor running, slowly stream in the extra virgin olive oil to create a creamy, smooth texture. Scrape the sides as needed.
- Customize creaminess: If using tahini, add it now and pulse until fully incorporated and smooth but still slightly textured for artisanal feel.
- Adjust seasoning: Taste and add more salt, lemon, or cumin as desired. Blend one last time to mix thoroughly.
- Chill before serving: Transfer the dip to a serving bowl and refrigerate for at least 30 minutes to allow flavors to meld.
- Prepare veggie sticks: Wash and slice veggies into uniform sticks for easy dipping.
- serve: arrange veggie sticks on a platter alongside the chilled spinach white bean dip. Optionally garnish with a drizzle of olive oil and a sprinkle of paprika or toasted seeds.
Tips for Success
- Use canned white beans rinsed well to reduce starchiness and create a cleaner flavor.
- If you prefer a thinner dip, add a splash of cold water or unsweetened plant-based milk while blending.
- To elevate texture, reserve a few whole beans and gently fold them into the dip after pureeing for added bite.
- Make the dip up to 24 hours ahead and store covered in the fridge for convenience.
- Experiment with fresh herbs like parsley or dill blended in for a fresh herbal twist.
- For a nut-free version, omit tahini and add a few tablespoons of plain Greek yogurt or a mild unsweetened nut milk.
Serving Suggestions
Present your fresh & Healthy Spinach White Bean Dip with Veggie sticks nestled on a rustic wooden board or a bright ceramic plate.Garnish the dip with a drizzle of golden olive oil paired with a dusting of smoked paprika or crushed red pepper flakes to add color and a hint of warming spice. Sprinkle toasted sesame seeds, pine nuts, or finely chopped fresh herbs like cilantro or mint for extra flair.
For variety, include pita chips, whole grain crackers, or warm naan bread on the side for guests who want alternative dippers.This versatile presentation transforms the humble dip into a show-stopping appetizer perfect for casual snacking, game day, or sophisticated gatherings.
| Nutrient | per Serving |
|---|---|
| Calories | 140 kcal |
| protein | 8 g |
| Carbohydrates | 18 g |
| Fat | 5 g |
For more healthy dips packed with fresh ingredients, check out our Garden Fresh Hummus. Learn about the benefits of plant-based snacking at the USDA ChooseMyPlate official site.
Q&A
Q&A: Fresh & Healthy Spinach White Bean Dip with Veggie Sticks
Q1: What makes this spinach white bean dip a healthy choice?
A1: This dip combines nutrient-packed spinach with protein-rich white beans, creating a creamy, fiber-filled spread without the need for heavy creams or artificial additives. It’s naturally low in fat,high in vitamins,and perfect for a nourishing snack or appetizer.
Q2: can I prepare this dip ahead of time?
A2: Absolutely! This dip actually tastes better after resting in the fridge for a couple of hours, allowing the flavors to meld together beautifully. You can prepare it a day in advance, making it ideal for parties or quick weekday snacks.
Q3: What vegetables pair best with spinach white bean dip?
A3: Crunchy veggies like carrots, celery, cucumber, bell peppers, and snap peas complement the creamy texture of the dip perfectly. Their natural sweetness and crispness create a delightful balance that’s both refreshing and satisfying.
Q4: How can I adjust the flavor if I want it spicier?
A4: To add a kick, try blending in a bit of fresh minced garlic, a dash of cayenne pepper, or a sprinkle of crushed red pepper flakes. A splash of lemon juice can also brighten the dip while enhancing the spicy notes.
Q5: Is this dip suitable for special diets?
A5: Yes! This dip naturally fits into vegan, vegetarian, and gluten-free diets. It’s dairy-free as well, making it a versatile choice for many dietary preferences or restrictions.
Q6: Can I swap the white beans for another type of legume?
A6: While white beans offer a mild flavor and creamy texture,you can experiment with chickpeas or cannellini beans for a slightly different taste and nutritional profile. Each legume brings its own unique twist, so feel free to get creative.
Q7: How long does this dip stay fresh?
A7: Stored in an airtight container in the refrigerator, the spinach white bean dip stays fresh for up to 4-5 days. Always give it a quick stir before serving, as natural separation may occur.
Q8: What’s the best way to blend the ingredients smoothly?
A8: For the creamiest consistency, use a food processor or high-powered blender. If you like a chunkier texture, pulse the ingredients lightly or mash them by hand with a fork or potato masher.
Q9: Can children enjoy this dip?
A9: Definitely! The mild, creamy flavors are usually a hit with kids, and serving it with colorful veggie sticks makes snack time fun and appealing. Plus, it’s a sneaky way to introduce more greens into their diet.
Q10: Any tips for making the dip more vibrant?
A10: Fresh lemon zest or a sprinkle of chopped fresh herbs like parsley or basil can brighten both the flavor and the look. A drizzle of good-quality olive oil on top before serving adds a lovely sheen and richness.
Enjoy your fresh and healthy dip adventure-it’s a tasty way to get your greens and fuel your day!
To Wrap it Up
Whether you’re looking for a vibrant snack to brighten up your afternoon or a nutritious addition to your next gathering, this Fresh & Healthy Spinach White Bean Dip with Veggie Sticks delivers on all fronts. Packed with wholesome ingredients and bursting with flavor, it’s a simple yet satisfying way to nourish your body and delight your taste buds. So next time you crave something crunchy, creamy, and guilt-free, reach for this dip-your new go-to for fresh, healthy snacking made easy.
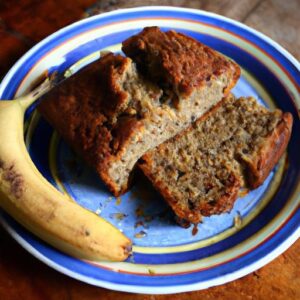
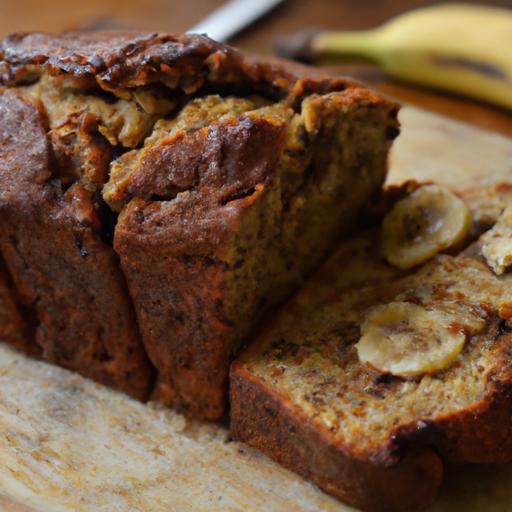
Delicious Grain-Free Banana Bread offers a nourishing twist on a classic favorite, perfect for those seeking a wholesome yet indulgent treat.Rooted in wholesome ingredients and free from grains, this banana bread embraces natural sweetness and vibrant flavors while catering to a variety of dietary needs. Whether you’re managing gluten intolerance or simply aiming for a clean-eating lifestyle, this recipe delivers moist, fragrant slices that are as satisfying as traditional versions-without any compromise.
prep and Cook Time
- Preparation: 15 minutes
- Cooking: 50 minutes
- Total Time: 1 hour 5 minutes
Yield
serves 8 generous slices
Difficulty Level
Easy – great for beginner bakers and busy home cooks alike
Key Ingredients That Make This Banana Bread Nutritious and Delicious
- Ripe Bananas: Naturally sweet and packed with potassium, bananas form the heart of this loaf, providing moisture and a luscious, tender crumb.
- Almond Flour: A rich, grain-free base lending a subtly nutty flavor and an ideal crumb texture, plus healthy fats and protein.
- Coconut Flour: Adds fiber and absorbs moisture beautifully, helping to achieve the perfect bake without grains.
- Eggs: Bind the ingredients while delivering essential protein and richness.
- Raw Honey or Maple Syrup: Natural sweeteners that are unrefined and gentle on blood sugar compared to refined sugars.
- Coconut Oil: Infuses the bread with subtle tropical notes and moistness while keeping it dairy-free.
- Vanilla extract & Baking Soda: Enhance the depth of flavor and provide gentle leavening for the ideal rise.
- Optional Add-ins: Walnuts or dark chocolate chips for texture and bursts of flavor.
Step-by-Step Guide to Baking Moist and Flavorful Grain-Free Banana Bread
- Preheat your oven to 350°F (175°C). Grease a 9×5-inch loaf pan or line it with parchment paper to ensure easy removal.
- Mash the ripe bananas in a large bowl using a fork or potato masher until smooth and creamy with just a few small lumps remaining.
- Whisk the eggs in a separate bowl until light and frothy, then add the melted coconut oil, honey (or maple syrup), and vanilla extract. Stir until fully combined.
- Combine wet and dry ingredients: Slowly add the mashed bananas to the wet mixture and mix well. In another bowl,sift together almond flour,coconut flour,baking soda,and a pinch of salt.
- Fold the dry ingredients gently into the wet ingredients. Stir just until combined without overmixing to keep the bread tender.
- Optional: Gently fold in ½ cup chopped walnuts or dark chocolate chips for added texture and bursts of flavor.
- Pour the batter into the prepared loaf pan, smoothing the top with a spatula.
- Bake for 45-50 minutes, or until a toothpick inserted into the center comes out clean or with just a few moist crumbs.
- Cool the banana bread in the pan for 15 minutes, then transfer it to a wire rack to finish cooling before slicing.
Tips and variations to Customize Your Banana Bread Experience
- For extra moisture: Add 2 tablespoons of unsweetened applesauce or Greek yogurt (dairy-free if preferred) to the batter.
- Swap nuts: Use pecans, hazelnuts, or pumpkin seeds for different flavor profiles and crunch.
- Spice it up: Add a teaspoon of ground cinnamon, nutmeg, or cardamom to bring warmth and depth.
- Sweetener adjustments: Less sweet tooth? Reduce honey/maple syrup to 2 tablespoons or substitute with mashed dates.
- Make ahead & storage: Store airtight at room temperature up to 3 days or refrigerate for a week.This bread freezes beautifully-slice and wrap portions for speedy breakfasts or snacks.
- For Vegan Diets: Replace eggs with flax eggs (1 tablespoon ground flax + 3 tablespoons water per egg) but note the texture will be slightly different.
- Visual Tip: Brush a touch of coconut oil on top before baking for a golden, glossy crust.
Serving Suggestions
This grain-free banana bread shines when served slightly warm, allowing the gentle aroma of bananas and coconut to envelop your senses. Enhance your experience with a spread of creamy almond butter or a drizzle of raw honey. For a festive touch, garnish with toasted walnut halves or a sprinkle of chia seeds on top just before serving. Pair it with a cup of herbal tea or vanilla almond milk for a cozy, nourishing snack or breakfast.

| Nutrient | per Slice (1/8 loaf) |
|---|---|
| Calories | 200 |
| Protein | 6g |
| Carbohydrates | 18g |
| Fat | 12g |
for more nourishing snack ideas, check out our grain-free snack recipes. To deepen your understanding of almond flour benefits, visit this complete guide from Healthline.
Q&A
Q&A: Delicious Grain-Free Banana Bread: Healthy & Easy Recipe
Q1: What makes this banana bread grain-free?
A: Instead of traditional wheat flour, this recipe uses alternative flours like almond flour or coconut flour. These options keep the bread gluten-free and grain-free, making it a great choice for those with gluten sensitivities or anyone looking to reduce grain intake.
Q2: How can I ensure my banana bread stays moist without using grains?
A: The secret lies in ripe bananas and healthy fats like coconut oil or butter. Eggs also help bind and add moisture. Combining these with natural sweeteners such as honey or maple syrup creates a wonderfully tender crumb without dryness.
Q3: Is this banana bread suitable for people following a paleo or keto diet?
A: Absolutely! By using grain-free flours and natural sweeteners in moderation, this recipe aligns well with paleo guidelines. For keto, you can adjust sweeteners and monitor carb content; using more coconut flour and less banana can lower the carbs while still keeping the delicious banana flavor.
Q4: Can I add mix-ins like nuts or chocolate chips?
A: Definitely! Chopped walnuts, pecans, or dairy-free chocolate chips are excellent additions that enhance texture and flavor.they bring a delightful crunch or melty surprise while keeping the recipe wholesome and delicious.
Q5: What’s the best way to store this banana bread?
A: Store your grain-free banana bread in an airtight container at room temperature for up to three days. For longer freshness, refrigerate it wrapped tightly for up to a week, or freeze slices individually for quick thawing and snacking.
Q6: How ripe should the bananas be for this recipe?
A: The riper, the better! Look for bananas that are heavily speckled or even darkened.thier natural sugars are intensified, which boosts the sweetness and moisture in the bread without needing extra refined sugar.
Q7: Can I make this recipe vegan?
A: Yes! Substitute eggs with flax or chia egg replacers (1 tablespoon ground flaxseed or chia seeds mixed with 3 tablespoons water per egg) and use plant-based oils or vegan butter. This will maintain binding and moisture while keeping it plant-pleasant.
Q8: Is this banana bread suitable for kids and picky eaters?
A: Most definitely! The sweet, familiar banana taste along with the soft texture usually wins over kids and adults alike. Plus, it’s packed with nourishing ingredients, making it a feel-good treat that sneaks in some healthy goodness effortlessly.
Q9: How long does it take to bake and prep this bread?
A: Prep is simple and quick-around 10 to 15 minutes. Baking usually takes about 45 to 55 minutes, depending on your oven and pan size. It’s an easy recipe perfect for a weekend project or an anytime wholesome snack.
Q10: Can I customize the flavor of this banana bread?
A: Of course! Add spices like cinnamon, nutmeg, or cardamom for warmth; swirl in some almond butter for richness; or fold in shredded coconut for extra texture. The grain-free base is versatile,allowing you to tailor the loaf to your taste buds.
Wrapping up
as you slice into this delicious grain-free banana bread, you’re not just enjoying a treat – you’re embracing a wholesome, nourishing way to satisfy your sweet tooth without compromise. This easy recipe proves that healthy baking doesn’t have to be elaborate or dull; it’s a celebration of natural flavors and simple ingredients coming together in perfect harmony. Whether you’re avoiding grains for dietary reasons or simply seeking a nutritious snack, this banana bread offers a versatile option that’s as comforting as it is clever. So next time you have ripe bananas waiting on your counter, remember: wholesome indulgence is just a loaf away. Happy baking!
Healthy Batch Cooking Ideas for Stress-Free Meal Prep open the door to vibrant, flavorful dishes that not only save you precious time but also nourish your body throughout the week. Drawing inspiration from global cuisines that celebrate fresh,wholesome ingredients,this approach transforms everyday meal prepping into an enjoyable ritual,leaving behind the stress of daily cooking. Whether juggling a busy schedule or simply aiming for balanced nutrition, integrating smart ingredients and savvy techniques guarantees that each batch meal bursts with satisfying textures and rich flavors.
Prep and Cook Time
Total time: 1 hour 15 minutes
yield
6 hearty servings
Difficulty Level
Easy to Medium
Ingredients
- 2 cups quinoa, rinsed
- 4 cups low-sodium vegetable broth
- 1 large sweet potato, peeled and cubed (about 2 cups)
- 1 can (15 oz) chickpeas, drained and rinsed
- 2 cups chopped kale, stems removed
- 1 cup shredded carrots
- 1 medium red bell pepper, diced
- 1 small red onion, finely chopped
- 3 cloves garlic, minced
- 2 tablespoons olive oil
- 1 teaspoon smoked paprika
- 1 teaspoon ground cumin
- ½ teaspoon turmeric powder
- Salt and freshly ground black pepper, to taste
- Juice of 1 lemon
- Fresh parsley, chopped, for garnish
- 1 avocado, sliced (optional, for serving)
Instructions
- Preheat your oven to 400°F (200°C).Toss the cubed sweet potatoes with 1 tablespoon olive oil, smoked paprika, and a pinch of salt. Spread them evenly on a baking sheet and roast for 25-30 minutes until tender and lightly caramelized, flipping halfway through.
- While the sweet potatoes roast, cook the quinoa. In a medium saucepan, bring vegetable broth to a boil. add rinsed quinoa, reduce heat to low, cover, and simmer for 15 minutes or until the liquid is absorbed and quinoa is fluffy. Remove from heat and set aside.
- Heat the remaining olive oil in a large skillet over medium heat. Add chopped onion and garlic, sautéing until fragrant and translucent, about 5 minutes.
- Stir in diced red bell pepper,shredded carrots,kale,cumin,turmeric,salt,and pepper. Cook until kale wilts and vegetables soften, about 7 minutes, stirring frequently to maintain vibrant color and texture.
- Add chickpeas to the skillet and cook for another 3 minutes, allowing the flavors to meld.
- Combine the cooked quinoa and roasted sweet potatoes with the vegetable mixture in the skillet. Stir gently to mix all ingredients thoroughly and coat evenly with spices. Adjust seasoning with lemon juice and additional salt or pepper to taste.
- Remove from heat and let it cool slightly. Portion into airtight containers or meal prep bowls for effortless grab-and-go lunches throughout the week.
Tips for Success
- Ingredient swaps: Feel free to substitute kale for spinach or Swiss chard for a different leafy green spin that still packs nutrients.
- Make ahead: This dish keeps beautifully refrigerated for up to 5 days and freezes well for up to 3 months. Thaw overnight and reheat gently.
- boost protein: Add cooked lentils or edamame for an extra plant-based protein punch while keeping everything vegan and wholesome.
- Batch spice blend: Pre-mix smoked paprika, cumin, turmeric, salt, and pepper in advance to sprinkle over batches quickly and uniformly.
- Keep quinoa fluffy: Fluff cooked quinoa with a fork instantly after cooking to prevent clumping.
Serving Suggestions
Serve with creamy avocado slices and a sprinkle of fresh parsley to add brightness and a touch of silky texture. For an extra pop of flavor, drizzle with a tahini lemon dressing or a crisp cucumber yogurt sauce (non-dairy options welcome). Pair this colorful bowl with warm whole-grain flatbreads or crunchy raw veggies for a complete meal packed with variety and crunch.

| Nutrient | Per Serving |
|---|---|
| Calories | 370 kcal |
| Protein | 12 g |
| Carbohydrates | 55 g |
| Fat | 9 g |
For more batch cooking inspiration, check out our meal prep essentials guide. To deepen your understanding of nutrient-dense ingredients, explore the Healthy Eating Plate by Harvard T.H. Chan School of Public Health, an authoritative resource on balanced meals.
Q&A
Q&A: Healthy Batch Cooking Ideas for Stress-Free Meal Prep
Q1: What exactly is batch cooking, and how can it make my week less stressful?
A1: Batch cooking is the art of preparing large quantities of meals or meal components in one cooking session, then storing them for swift, nutritious use throughout the week. It transforms chaotic evenings into calm, organized moments, freeing you from the daily “What’s for dinner?” dilemma. By dedicating a bit of time upfront, you gift yourself hours of stress-free mealtime-think of it as prepping your week’s fuel in one go!
Q2: Which healthy ingredients work best for batch cooking?
A2: Ingredients that are versatile, nutritious, and keep well are your best friends in batch cooking. think hearty grains like quinoa, brown rice, or barley; robust legumes such as lentils and black beans; vibrant roasted veggies; and lean proteins like chicken breast or tofu. Incorporate a variety of colorful produce to boost both flavor and nutrients, turning each meal into a vibrant festivity of health.
Q3: How can I keep my batch-cooked meals interesting and avoid flavor fatigue?
A3: Spice it up! Use diverse marinades, herbs, and sauces that can transform the same base ingredients into entirely different dishes. For instance, grilled chicken can become a Mediterranean bowl one day and a spicy taco filling another. Rotating textures-like creamy purées, crunchy salads, and hearty stews-also helps keep your palate engaged and excited.
Q4: What are some simple batch cooking ideas for beginners?
A4: Start small with dishes that have few steps but big rewards. Overnight oats, chili packed with beans and veggies, baked salmon with roasted sweet potatoes, or a giant pot of vegetable soup can all be prepped in bulk. Also, versatile grain salads featuring seasonal veggies and a zesty lemon vinaigrette are quick to assemble and store beautifully.
Q5: How do I store batch-cooked meals safely and keep them tasting fresh?
A5: Invest in airtight containers that are freezer-friendly if you plan to store meals for more than a few days. Cool dishes fully before refrigerating to maintain texture and taste. Label containers with dates and contents to navigate your fridge or freezer like a pro. For freshness, consider prepping sauces or dressings separately and adding them just before serving.
Q6: Can batch cooking fit into a busy lifestyle with limited kitchen time?
A6: Absolutely! The beauty of batch cooking is that a focused 2-3 hour session-perhaps during weekend downtime-can nourish you for multiple days. Utilize slow cookers or sheet pans to maximize efficiency, and consider prepping certain staples like grains or chopped veggies in advance. even if your kitchen time is limited, a little planning turns into big time savings later.
Q7: How can I balance nutrition when batch cooking?
A7: Aim for the classic “plate method” even in batch cooking: half your meal with vegetables, one quarter with lean protein, and one quarter with whole grains or starchy veggies. Incorporate healthy fats like avocado or nuts, and keep an eye on sodium and refined carbs. This balance ensures sustained energy and satisfaction, preventing the midweek slump.
Q8: What are good ideas for batch-cooked meals that are kid-friendly?
A8: Kid-approved batch meals often include favorites given a healthy twist. Think homemade turkey or veggie meatballs served with whole-grain pasta,colorful stir-fries with mild flavors,or build-your-own grain bowls where kids can customize toppings. Sneaking in pureed or finely chopped veggies inside sauces and stews helps keep nutrition and smiles high.
Q9: How can I make my batch cooking lasting and reduce food waste?
A9: Embrace “root-to-stem” cooking by using vegetable scraps for broths or stir-fries.Plan meals around produce that’s in season and on sale. Freeze portions you won’t eat within a few days to preserve freshness, and repurpose leftovers creatively-turn roasted veggies into a frittata or blend soups into dips. Mindful batch cooking benefits both your health and the planet.
Q10: Where can I find inspiration for new batch cooking recipes?
A10: Digital platforms like food blogs,YouTube channels focused on meal prep,and social media accounts dedicated to healthy cooking are treasure troves of ideas. Consider thematic weeks-mediterranean, Asian-inspired, or plant-based-and experiment with global flavors to keep your menus fresh and exciting. your kitchen can become a vibrant laboratory of nourishing flavor!
With these insights, batch cooking becomes less of a chore and more of a joyful culinary ritual-one that fuels your wellbeing and frees your time for what truly matters. Happy cooking!
The Way forward
embracing healthy batch cooking isn’t just about filling your fridge-it’s about reclaiming your time,nourishing your body,and easing the daily hustle. With a little planning and a dash of creativity, meal prep transforms from a chore into a joyful ritual that supports your well-being and keeps stress at bay. So, gather your favorite ingredients, don your apron, and let these batch cooking ideas be your secret weapon for delicious, wholesome meals all week long. Here’s to savoring every bite without the scramble-because healthy eating should feel effortless, not overwhelming.
Delicious diabetes-friendly dinners begin with thoughtful ingredient choices that balance flavor and nutrition to support steady blood sugar control. Drawing inspiration from Mediterranean cuisine, this vibrant Grilled Lemon Herb Chicken with quinoa Salad blends low glycemic ingredients and wholesome protein, delivering a satisfying yet nourishing plate. Each bite bursts with zesty brightness and earthy textures, proving that managing diabetes doesn’t mean sacrificing taste or enjoyment.
Prep and Cook Time
- Preparation: 15 minutes
- Cooking: 25 minutes
- Total Time: 40 minutes
Yield

Serves 4
Difficulty Level
Easy
Ingredients
- for the Grilled Lemon Herb Chicken:
- 4 boneless, skinless chicken breasts (about 6 oz each)
- 2 tablespoons fresh lemon juice
- 2 teaspoons extra virgin olive oil
- 3 garlic cloves, minced
- 1 teaspoon dried oregano
- ½ teaspoon ground black pepper
- ½ teaspoon sea salt
- 1 tablespoon fresh parsley, chopped (for garnish)
- For the Quinoa Salad:
- 1 cup tricolor quinoa, rinsed well
- 2 cups low-sodium vegetable broth
- 1 medium cucumber, diced
- 1 cup cherry tomatoes, halved
- ¼ cup red onion, finely chopped
- ¼ cup Kalamata olives, pitted and sliced
- 2 tablespoons fresh mint leaves, chopped
- 2 tablespoons fresh lemon juice
- 1 tablespoon extra virgin olive oil
- Salt and pepper to taste
Instructions
- Marinate the chicken: In a medium bowl, whisk together lemon juice, olive oil, garlic, oregano, pepper, and salt. Add chicken breasts and coat evenly. Cover and refrigerate for at least 20 minutes to absorb the flavors.
- Cook the quinoa: Place rinsed quinoa and vegetable broth in a medium saucepan. Bring to a boil over medium heat. Reduce heat to low, cover, and simmer for 15 minutes or untill liquid is absorbed. Remove from heat and fluff with a fork.
- Prepare the salad: In a large bowl, combine cooked quinoa, cucumber, cherry tomatoes, red onion, olives, and mint.In a small bowl, whisk lemon juice and olive oil, then drizzle over the quinoa salad. Toss gently to mix and season with salt and pepper to taste.
- Grill the chicken: Preheat a grill pan or outdoor grill to medium-high heat. Remove chicken from marinade and grill for 5-6 minutes per side or until internal temperature reaches 165°F (75°C) and juices run clear.
- Rest and serve: Let grilled chicken rest for 5 minutes before slicing. Plate alongside a generous scoop of quinoa salad. Garnish with fresh parsley for a pop of color and aroma.
Tips for Success
- Make ahead: Quinoa salad can be prepared up to 2 days in advance and refrigerated, allowing flavors to meld beautifully.
- Protein alternatives: Substitute chicken with firm tofu or wild-caught salmon for variety while keeping blood sugar steady.
- Extra flavor: add a pinch of smoked paprika or cumin to the chicken marinade for a warm, earthy twist.
- Prevent sticking: Brush the grill with a little olive oil before cooking to ensure perfect grill marks and easy flipping.
Serving Suggestions
This dish shines with a side of steamed green beans or roasted brussels sprouts for added fiber and color. Top the quinoa salad with tangy crumbled feta or a sprinkle of toasted almonds to elevate texture and flavor complexity. A wedge of lemon on the side invites an extra zing, enhancing the refreshing brightness.

| Nutrient | Per Serving |
|---|---|
| Calories | 350 |
| Protein | 38g |
| Carbohydrates | 28g |
| Fat | 10g |
For more ideas on balancing proteins and low glycemic ingredients in your evening meals, check out Healthy High Protein Dinners for blood Sugar Control. To dive deeper into diabetes-friendly nutrition guidelines, visit the American Diabetes association Nutrition Section.
Q&A
Q&A: Delicious Diabetes-Friendly Dinners – Healthy & Tasty Ideas
Q1: What makes a dinner diabetes-friendly without sacrificing flavor?
A: A diabetes-friendly dinner focuses on balanced portions of complex carbohydrates, lean proteins, and healthy fats that help maintain steady blood sugar levels. Incorporating vibrant herbs, spices, and fresh ingredients ensures the meal stays bursting with flavor-proving that health and taste go hand in hand!
Q2: Which types of proteins are best suited for diabetes-friendly dinners?
A: Lean proteins like grilled chicken breast, turkey, fish, tofu, and legumes are excellent choices. They help stabilize blood sugar and keep you full longer without adding excess saturated fat or calories. Seafood such as salmon or cod adds heart-healthy omega-3s and a deliciously satisfying component.
Q3: How can I include carbohydrates in a way that’s friendly to my blood sugar?
A: opt for complex carbs packed with fiber, such as quinoa, brown rice, sweet potatoes, and whole grains. These slowly release glucose into the bloodstream, preventing blood sugar spikes. Pairing them with vegetables and protein further balances the meal.
Q4: Are there any easy vegetable-packed dinner ideas that work well for people with diabetes?
A: Absolutely! Stir-fries brimming with colorful veggies and tofu or chicken,roasted vegetable medleys with herbs and olive oil,or hearty salads with leafy greens,avocado,nuts,and grilled fish are all simple yet satisfying options.Vegetables add fiber, nutrients, and volume without raising blood sugar.
Q5: How can I add flavor to diabetes-friendly dinners without extra sugars or salt?
A: Experiment with fresh herbs like basil,cilantro,or rosemary,and spices such as cumin,paprika,or turmeric. A squeeze of lemon or lime, a dash of vinegar, or a garlic and ginger base can elevate dishes naturally. These ingredients deliver vibrant tastes while keeping meals healthy.Q6: What role does meal timing and portion control play in managing diabetes-friendly dinners?
A: eating meals at regular intervals supports stable blood sugar through the day. Controlling portion sizes-especially carbohydrates-prevents overload and assists insulin effectiveness. Combining proteins,fats,and fiber-rich carbs in moderate portions maximizes glycemic control.Q7: Can you recommend a simple, delicious diabetes-friendly dinner recipe to try tonight?
A: Certainly! Try a baked lemon herb salmon with a side of quinoa pilaf packed with diced bell peppers, spinach, and chickpeas. Finish with a side of steamed broccoli drizzled with a garlic-tahini dressing. This meal is rich in protein, fiber, and healthy fats, delighting both your taste buds and your body.
Q8: How significant is hydration when enjoying diabetes-friendly meals?
A: Staying hydrated is vital. Water aids digestion, supports metabolism, and helps regulate blood sugar levels. Pair your meals with water infused with cucumber or fresh mint for a refreshing and beneficial accompaniment.Q9: What swap suggestions exist if I want to reduce carbs even further in dinner recipes?
A: Replace traditional sides like pasta or rice with cauliflower rice, spiralized zucchini noodles, or roasted spaghetti squash. These lower-carb vegetables add texture and nutrients without causing sharp blood sugar rises.
Q10: Is it possible to enjoy comfort foods in a diabetes-friendly way?
A: Definitely! Comfort classics can be reinvented by using whole-food, low-glycemic ingredients and reducing processed sugars or refined flours. Think turkey chili loaded with beans and veggies, cauliflower mashed “potatoes,” or baked chicken parmesan with almond flour crust-all comforting yet balanced.
The Conclusion
As you embark on your journey to balance flavor and health, remember that delicious diabetes-friendly dinners are not just possible-they’re perfectly achievable. With a sprinkle of creativity, a dash of mindful ingredient choices, and a generous serving of love for your body, every meal can become a celebration of taste and well-being. Embrace these recipes as your culinary allies, proving that managing diabetes doesn’t mean sacrificing enjoyment at the dinner table. Here’s to many more satisfying,nourishing,and vibrant dinners ahead-because eating well is the sweetest victory of all.