


There’s something irresistibly comforting about a warm, spongy pudding that melts in your mouth, and what better way to achieve that perfect texture than with the magic of a pressure cooker? Welcome to the delightful world of “Swift & Fluffy: Mastering Pressure Cooker Sponge pudding,” where classic dessert charm meets modern culinary convenience. In this article, we’ll unravel the secrets behind achieving that airy, tender crumb in a fraction of the time, transforming your kitchen into a haven of sweet, cloud-like indulgence. whether you’re a seasoned home cook or a curious beginner, get ready to elevate your dessert game with techniques that promise speed, simplicity, and sensational results.
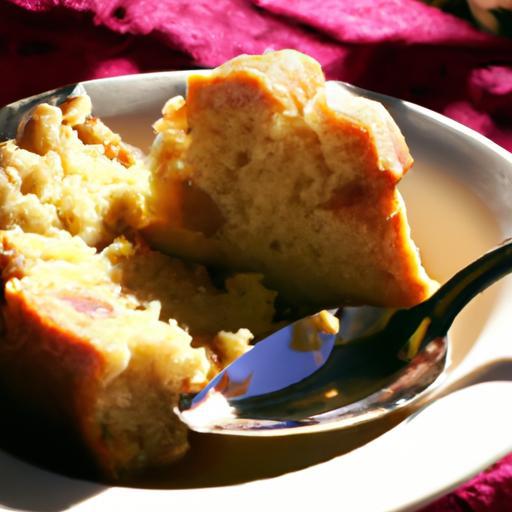
Quick & Fluffy: Mastering Pressure Cooker Sponge Pudding invites you to rediscover a classic dessert with an irresistible cloud-like texture achieved in a fraction of customary cooking time. Originating from British teatime traditions, this light and airy sponge pudding has been transformed through modern pressure cooking techniques, making it easier than ever to enjoy indulgent softness and delicate flavour without the wait.
Prep and Cook Time
- Preparation: 15 minutes
- Pressure cooking: 12 minutes
- Resting: 5 minutes (off heat)
- Total Time: approximately 32 minutes
Yield
Serves 6 generous portions
Difficulty Level
Easy – Perfect for both beginner cooks and dessert aficionados
Ingredients
- 4 large eggs, at room temperature
- 3/4 cup granulated sugar
- 1 cup all-purpose flour, sifted
- 1 tsp baking powder
- 1 tsp pure vanilla extract
- 1/4 cup whole milk, warmed slightly
- Pinch of salt
- Butter for greasing the pudding mold (about 1 tbsp)
- Optional: Zest of 1 lemon or orange for subtle citrus notes
Instructions
- Prepare your mold: Generously butter a 6-cup heatproof pudding basin or silicone mold to prevent sticking. Set aside.
- Separate the eggs: Carefully separate the egg yolks from the whites into two medium bowls. Ensure no yolk contaminates the whites for optimal volume.
- Beat the egg whites: Using an electric mixer, whisk the egg whites with a pinch of salt until soft peaks form. Gradually add half the sugar, then continue whisking until glossy stiff peaks develop. This will ensure your sponge pudding remains incredibly light and fluffy.
- mix yolks and flavorings: in the other bowl, beat the egg yolks with the remaining sugar until pale and creamy. Stir in the vanilla extract and warm milk. If desired, fold in citrus zest for added freshness.
- Incorporate dry ingredients: Gently sift the flour and baking powder over the egg yolk mixture. Fold carefully to maintain airiness but ensure a uniform batter without streaks.
- Combine mixtures: Fold one-third of the whipped egg whites into the yolk batter to lighten it,then gently fold in the remaining whites with a spatula. Handle the batter delicately to preserve every precious bubble.
- fill the mold: pour the batter into the prepared pudding basin, smoothing the surface lightly.
- Prepare the pressure cooker: Add 1.5 cups of water to the base. Place a trivet or steaming rack inside. Set the pudding basin carefully on top, ensuring it’s stable and that water doesn’t splash inside.
- Seal and cook: Close the pressure cooker lid securely and bring to high pressure. Cook for exactly 12 minutes for perfectly cooked,fluffy sponge pudding. Adjust time slightly if using different pressure models-refer to your manual.
- Release and rest: After cooking, perform a natural pressure release for 5 minutes to prevent sudden deflation of the sponge.
- Serve warm: Using oven mitts, carefully remove the pudding basin.Let it cool slightly before inverting onto serving plates.
Tips for Success
- Ingredient temperature matters: Use room temperature eggs and warm milk to promote gentle incorporation and proper rising.
- Whipping whites: Achieving stiff peaks is critical. Underwhipping causes dense pudding; overwhipping can led to separation.
- Timing is key: Pressure cooking longer than recommended will cause overcooking and inevitable dryness.
- Mold substitutions: Use silicone molds or ceramic bowls suitable for pressure cookers if a traditional pudding basin isn’t available.
- Make-ahead option: Assemble the batter and refrigerate for up to 2 hours, giving a gentle stir before cooking to reintroduce air.
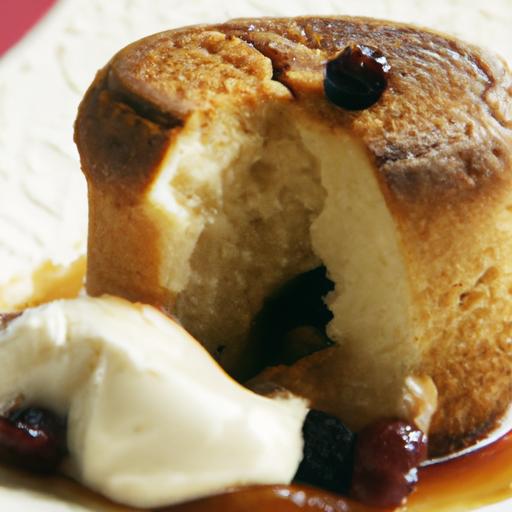
Serving Suggestions
Enhance this quick & fluffy sponge pudding with creative accompaniments for a truly memorable experience:
- Pour a generous drizzle of warm classic vanilla custard to add luscious creaminess.
- Top with a scattering of fresh berries-strawberries, raspberries, or blueberries-to introduce vibrant color and tang.
- Dust with finely grated dark chocolate or a light sprinkle of cinnamon for subtle complexity.
- Serve alongside a small scoop of vanilla or lemon sorbet for a refreshing contrast.
- Garnish with edible flowers or a twist of citrus peel for elegant presentation.

| Nutrient | Per serving |
|---|---|
| calories | 245 kcal |
| protein | 6 g |
| Carbohydrates | 38 g |
| fat | 5 g |
For more indulgent desserts perfected for home kitchens, explore our collection of pressure cooker dessert recipes. Unlock exceptional flavors while saving time and effort today!
Q&A
Q&A: Quick & Fluffy – Mastering pressure Cooker Sponge Pudding
Q1: what makes pressure cooker sponge pudding different from traditional oven-baked sponge puddings?
A: The pressure cooker uses steam and pressure to cook the pudding rapidly and evenly, resulting in an incredibly light, airy texture in a fraction of the time. Unlike the slow heat of an oven, the moist surroundings of a pressure cooker prevents drying out, ensuring a delightfully soft sponge every time.
Q2: Can I use a regular pressure cooker,or do I need an electric one?
A: Both types work beautifully! Traditional stovetop pressure cookers and electric pressure cookers each have their own charm. Just adjust cooking times slightly-electric models frequently enough have presets that simplify the process, while stovetop versions give you more control over pressure levels.
Q3: What are the key ingredients for a fluffy pressure cooker sponge pudding?
A: It’s all about balance: eggs provide structure and lift, sugar adds sweetness and tenderness, flour gives body, and a touch of baking powder helps with rise. Don’t forget a pinch of salt to enhance flavor and a splash of vanilla or citrus zest to brighten the taste.
Q4: How do I prevent my sponge pudding from turning out dense or soggy?
A: Avoid overmixing your batter-fold ingredients gently to keep air bubbles intact. Also, ensure your pressure cooker’s water level is just right-too much moisture can create sogginess, too little risks burning. Using a well-greased or lined pudding basin helps with an easy release and even cooking.
Q5: Can I add flavors or mix-ins without compromising the texture?
A: Absolutely! Fresh berries, grated citrus zest, or finely chopped nuts add bursts of flavor and texture without weighing down the sponge. Just fold them in gently at the end and scatter a few on top for a beautiful finish.
Q6: Is there a simple method to tell when the sponge pudding is perfectly cooked?
A: A skewer inserted into the thickest part shoudl come out clean or with just a few moist crumbs clinging to it. Also,the pudding should spring back lightly when pressed. If it’s wobbly or gooey in the center, a little more cooking time is needed.
Q7: What’s the best way to serve pressure cooker sponge pudding?
A: Serve warm with a dusting of powdered sugar, a drizzle of custard, or a dollop of whipped cream. Fresh fruit or a spoonful of homemade jam can elevate this humble dessert to a showstopper on any table.
Q8: How long can I store leftover sponge pudding, and how do I reheat it?
A: Stored in an airtight container, sponge pudding stays fresh for up to 2 days in the fridge. reheat gently in the microwave or steam it briefly to regain that soft, fluffy texture without drying out.
Q9: Are there any safety tips for cooking sponge pudding in a pressure cooker?
A: Always follow your pressure cooker’s manual, especially regarding liquid amounts and maximum fill levels. Use heatproof containers designed to fit comfortably inside the cooker, and allow natural pressure release when possible to avoid sudden temperature shocks that coudl affect the pudding’s texture.
Q10: Can I make a vegan version of pressure cooker sponge pudding?
A: Yes! Swap eggs for flax or chia egg substitutes, use plant-based milk, and opt for vegan butter or oils. Adjust the leavening agents slightly if needed, and you’ll have a fluffy, appetizing vegan sponge pudding ready in no time.
Insights and Conclusions
Whether you’re a seasoned baker or a curious kitchen adventurer, mastering the art of pressure cooker sponge pudding opens up a world where speed meets fluffiness in perfect harmony. This humble dessert proves that you don’t need hours or fancy gadgets to create something delightfully comforting and impressively light. So next time a craving strikes or guests drop by unexpectedly, remember: with your pressure cooker at the ready, a cloud of sweet, spongy goodness is just minutes away. Embrace the quick, the fluffy, and the utterly satisfying – your taste buds will thank you.