


In the realm of culinary alchemy, few skills evoke as much reverence and mouthwatering anticipation as mastering the art of smoker planning. Transforming humble cuts of meat into succulent, smoke-kissed masterpieces is no mere cooking-it’s a delicate dance of temperature, timing, and technique. “Mastering Meat Magic: The Art of Smoker Preparation” invites you on a flavorful journey that unravels the secrets behind perfect smoke rings, tender textures, and deep, smoky infusions. Whether you’re a backyard enthusiast or an aspiring pitmaster, understanding your smoker’s nuances is the gateway to unlocking a symphony of taste that turns every meal into a celebration of fire and flavour.
Choosing the Perfect Wood and Fuel for Flavorful Smoke
Mastering meat Magic: The Art of Smoker Preparation begins with understanding how your choice of wood and fuel can elevate your smoked creations. Selecting the right combination infuses your meats with layers of distinctive aroma and depth, creating juicy, flavorful results that impress at every bite.
Hardwoods like hickory, oak, mesquite, and fruitwoods such as apple or cherry are the pillars of authentic smoking flavor.Hickory delivers a robust, bacon-like smokiness without pork overtones, while oak offers a milder, versatile profile. Fruitwoods impart a subtle sweetness, ideal for poultry and beef. Avoid resinous woods like pine or spruce that produce harsh,unpleasant smoke.
when choosing fuel, charcoal briquettes or lump charcoal are popular options-lump charcoal burns hotter and cleaner, but briquettes maintain steady heat longer. For electric or pellet smokers, the right pellets (made from 100% hardwood) provide consistent smoke flavor. Pairing your wood with quality fuel helps maintain an even burn and keeps your smoker humming with steady heat and gentle smoke throughout the cook.
Preparing Your Smoker for Optimal Heat and Consistency
Before lighting your fire, take time to prepare your smoker for the perfect cooking surroundings. Start by cleaning out ashes and residue from previous cooks to ensure unobstructed airflow, which is the key to consistent temperature control.
Arrange your fuel bed carefully-if using charcoal, build a “minion method” or a chimney starter to activate coals gradually. This helps you regulate the heat ramp-up and prevents unwanted flare-ups. place your wood chunks or chips atop the coals to produce clean, steady smoke and avoid the bitter taste of over-smoked meat.
Check all vents and dampers to make sure you can fine-tune airflow throughout the cook. Small adjustments will make huge differences, so test-run your smoker before you begin to get a feel for how it changes temperatures based on vent position, fuel quantity, and environmental conditions.
Essential techniques for Seasoning and Maintaining Your Smoker
The journey to perfect meat smoke starts with a well-seasoned smoker. Seasoning not only builds a protective patina but also enhances flavor and extends your smoker’s lifespan.
Begin seasoning by coating the interior surfaces with a thin layer of high-smoke-point oil-grapeseed or canola work best. Preheat your smoker to 225°F (107°C) and maintain that temperature for 2-3 hours to cure the oil and harden the seasoning.
Regular maintenance is just as crucial. Clean grates after every cook to avoid old residue mixing with new flavors. Inspect seals and replace worn gaskets to avoid temperature leaks. Periodically empty ash pans to improve airflow, and always use a soft brush and natural cleaning agents when scrubbing to preserve your smoker’s finish.
Timing and Temperature Control to Unlock Tender, Juicy Results
Mastery in smoker preparation shines brightest when timing and temperature are thoughtfully managed. Low and slow remains the mantra-cooking most cuts between 225°F and 275°F (107°C to 135°C) allows collagen in tougher meats to melt gently, tenderizing the flesh and locking in juices.
use a quality digital thermometer to monitor both your smoker’s ambient temperature and the internal temperature of your meat. This dual approach ensures precision and prevents overshoot. Open the smoker less frequently enough; each time the lid rises, heat escapes and delays the cook.
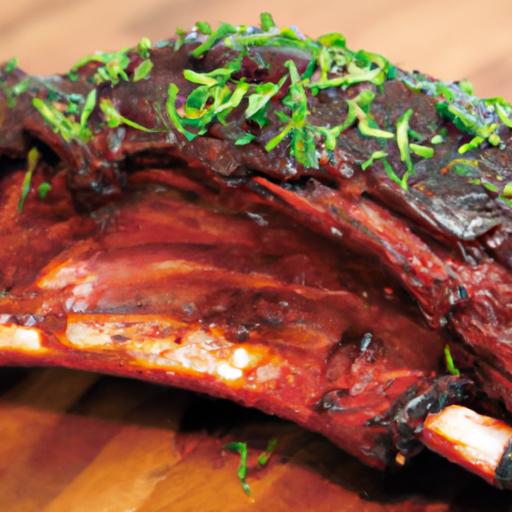
Consider the “stall” phase-a period where the meat’s internal temperature plateaus due to moisture evaporation. Patience here pays dividends. Wrapping meat in butcher paper or foil at this stage (known as the texas Crutch) can speed things up without sacrificing the bark.
When your target temperature is reached (e.g., 195°F-205°F for brisket), let the meat rest wrapped for at least 30 minutes. This allows juices to redistribute evenly, resulting in moister, more flavorful slices that speak to the heart of Mastering Meat Magic: The Art of Smoker Preparation.
Prep and Cook Time
- Prep Time: 20 minutes
- Cook Time: Varies by meat (4-16 hours)
Yield

Serves 6 to 8 depending on cut and accompanying sides.
Difficulty Level
Medium – Ideal for those comfortable with maintaining low and steady heat, but new smokers will also benefit from detailed practice.
Ingredients
- Hardwood chunks or chips: 3-5 pieces (choose from hickory, oak, apple, or cherry)
- Natural lump charcoal or briquettes: 4-6 cups
- High smoke point oil: 2 tbsp (grapeseed or canola recommended for seasoning)
- Water pan (optional): Fill halfway with water or apple juice to add moisture
- Meat of choice: Chicken, beef brisket, turkey breast, or lamb leg
- Quality digital meat thermometer for temperature monitoring
Instructions
- Prepare your smoker: Clean the grill grates and ash pan thoroughly, then wipe down interior with a paper towel dipped in oil. Preheat smoker to 225°F.
- Build your fire: Arrange charcoal in a minion method or chimney starter.Once lit, add hardwood chunks atop the coals for flavor.
- Stabilize temperature: Adjust vents for steady airflow and maintain 225-250°F, monitoring with your thermometer.
- Place water pan (optional): Set underneath grates, halfway filled, to help maintain moisture within the cooking chamber.
- Insert meat and monitor: Place meat on grates, fat side up for beef and lamb, fat side down for poultry.Maintain steady temperature and use probe thermometer to track internal meat temp.
- Control the smoke: Add wood chunks every 45-60 minutes, ensuring you’re producing gentle, blue smoke rather than thick white smoke which can impart bitterness.
- Manage stall phase: If internal temperature stalls around 160°F, wrap meat tightly in butcher paper or foil to speed cooking without losing bark texture.
- Finish and rest: Remove meat at target temperature (e.g., brisket 200°F). Rest wrapped meat on a rack or cooler for at least 30 minutes before slicing.
- Clean up: After cooking, remove ashes and clean grates while still warm for easy maintenance.
Chef’s Notes
- Wood choices: Mix fruitwoods with stronger hardwoods like hickory for balanced flavor profiles.
- Fuel tips: Avoid lighter fluid-chemical flavors can taint your smoke.
- Temperature checks: Calibrate your thermometer regularly for reliable readings.
- Make-ahead: Season your smoker and fuel a day in advance to reduce flare-ups and stabilize smoke flavor.
- Troubleshooting: If your smoke smells acrid or sooty, reduce wood quantity or open vents wider for better airflow.
Serving Suggestions
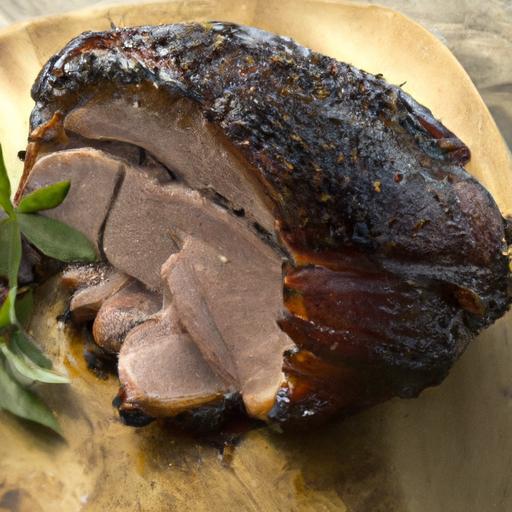
Present juicy smoked meats on a large wooden cutting board with fresh herbs like rosemary or thyme for color and aroma. Serve alongside rustic baked potatoes, grilled seasonal vegetables, or a tangy chimichurri sauce to awaken the palate. Garnish with thinly sliced radishes or pickled onions for shining contrast. Pair with a cold sparkling water or smoked paprika aioli for dipping to complement the smoky richness without overpowering.

| Nutrient | Amount per Serving |
|---|---|
| Calories | 350 kcal |
| Protein | 42 g |
| Carbohydrates | 3 g |
| Fat | 18 g |
For further detailed techniques on temperature management and wood selection,visit Awesome BBQ’s Wood Smoking Guide. Also, explore our Smoking Techniques for Beginners article to build foundational skills and confidence.
Q&A
Q&A: Mastering Meat Magic – The Art of Smoker Preparation
Q1: What is the secret to achieving perfect smoke rings and tender meat?
A1: The magic begins with patience and preparation. A proper smoke ring forms when the myoglobin in meat interacts with nitrogen dioxide from burning wood. Achieving this requires a clean, steady smoke at a low temperature-usually between 225°F and 250°F. Equally critically important is applying a well-balanced dry rub or marinade beforehand to enhance flavor and moisture retention. Remember,low and slow is the mantra: rushing the process is the enemy of tenderness.
Q2: How do I choose the right wood for smoking different kinds of meat?
A2: Each wood imparts a unique flavor profile, akin to a spice in cooking. Such as, hickory offers a bold, bacon-esque smokiness (without involving pork!), perfect for beef brisket or ribs. Fruitwoods like apple or cherry lend a sweet, mild smoke that pairs beautifully with poultry or game. Mesquite provides a strong, earthy bite, best reserved for shorter smokes or robust red meats. Experimenting with blends can also help craft your signature smoke house aroma.Q3: What’s the best way to prepare the smoker itself before cooking?
A3: Start by thoroughly cleaning your smoker to remove old ash and residue since leftover debris can cause off-flavors. Season your smoker with a light coat of cooking oil applied on grates to create a natural non-stick surface. preheat the smoker gradually,building your fire with quality lump charcoal or hardwood chunks until a consistent temperature stabilizes. Proper airflow control is crucial-adjust your smoker’s vents to maintain steady heat and keep smoke thin and blue rather than thick and white.
Q4: How can humidity affect the smoking process, and should I add water to my smoker?
A4: Humidity plays a subtle but pivotal role in meat smoking. Adding a water pan inside the smoker introduces moisture, which can help regulate temperature and create a gentler cooking environment. This moisture prevents meat from drying out and helps bind smoke particles to the surface for enhanced flavor.However, over-humidifying may soften bark or reduce smoke penetration, so balance is key. Pay attention to your particular smoker’s design and the ambient weather conditions for best results.
Q5: Are there tips for maintaining consistent temperature throughout a long smoke?
A5: Consistency is the bedrock of mouth-watering smoked meat. Use a good dual-probe thermometer-one to monitor ambient smoker temperature, the other to track meat internal temperature. Avoid opening the smoker door frequently, as each glimpse introduces heat and smoke loss. Manage fuel supply carefully by adding small amounts of charcoal or wood chunks rather than large dumps. Additionally,placing your smoker out of the wind and direct sun can stabilize heat fluctuations from the environment.
Q6: Can I smoke vegetables or other non-meat items successfully?
A6: Absolutely! Smoked vegetables develop luscious layers of flavor and vibrant textures. Root vegetables like carrots, beets, and potatoes absorb smoke beautifully, as do sweet bell peppers and mushrooms. For best results, lightly coat veggies with oil and season with herbs or spices before smoking at a slightly higher temperature than meat-around 275°F to 300°F-to caramelize sugars without overcooking. Grilled and smoked fruits such as pineapple or peaches also offer an irresistible sweet-smoky twist, perfect for side dishes or desserts.
Q7: How do I develop the ideal bark on smoked beef or poultry?
A7: The bark-the flavorful crust on the meat’s surface-is formed through a combination of dry rub seasoning, smoke exposure, and the Maillard reaction (a complex browning process). To cultivate that irresistible bark, apply a generous dry rub containing salt, sugar, and spices that promote caramelization. maintain moderate humidity (via a water pan) so the rub doesn’t burn too quickly, and ensure steady, thin smoke for hours without interruption. Resist the urge to spritz too often; minimal moisture exposure encourages crust formation.
Q8: What are common pitfalls beginners should avoid when preparing a smoker?
A8: New pitmasters often get tripped up by high temperatures, inconsistent airflow, and excessive smoke. Starting with a hot fire can cook meat too fast and toughen it, while poor vent management leads to uneven heat and heavy smoke tasting bitter or creosote-like. opening the smoker too frequently enough causes heat swings and prolongs cooking time. Lastly,neglecting to season the cooker or meat beforehand means missed flavor opportunities. Mastery stems from respect for the process, keen observation, and gradual learning.
Mastering the art of smoker preparation is a dance of flame, wood, and time-where the right tools meet thoughtful technique. With these insights, you’re ready to conjure smoky masterpieces that celebrate the rich tapestry of meat’s natural flavors. Let your smoker be the stage; your patience, the conductor. Meat magic awaits!
In Conclusion
As the final wisps of smoke curl into the evening air, remember that mastering the art of smoker preparation is more than just a step-it’s the very heartbeat of meat magic. By understanding your equipment, selecting the right wood, and tending the fire with patience and precision, you transform raw cuts into smoky masterpieces. So, whether you’re a novice or a seasoned pitmaster, let this knowledge fuel your next cookout, turning every brisket, rib, or pulled pork into a story worth savoring. Embrace the journey, respect the fire, and watch as your smoker becomes the stage where flavor and tradition perform their delicious dance.