
There’s something irresistibly nostalgic about the warm, sweet aroma of freshly made donuts wafting through the kitchen.Whether it’s the golden, pillowy exterior or the melt-in-your-mouth center, homemade donuts embody comfort and delight in every bite. Yet,many shy away from making them at home,fearing complexity or mess. Fear not! In this guide, we’ll unravel the art of crafting deliciously simple homemade donuts-showing you that with just a few ingredients and straightforward steps, you can create bakery-worthy treats that will impress family and friends alike. Get ready to turn your kitchen into a cozy donut haven where perfection is just a recipe away!
Choosing the right ingredients is the essential frist step in creating soft, fluffy donuts that melt in your mouth with every bite. Deliciously Simple: How to Make Homemade Donuts Perfectly begins with selecting fresh, high-quality components that make all the difference in texture and flavor. Using bread flour instead of all-purpose flour will improve gluten progress, resulting in a slightly chewier, yet tender crumb. Fresh yeast or high-quality active dry yeast ensures a consistent, lively rise that lends donuts their delicate, airy structure. Whole milk and the perfect balance of sugar and fat create richness without weighing down the dough.
Prep and Cook Time
- Preparation: 45 minutes (includes dough resting and proofing)
- Cooking: 15 minutes
- Total Time: 1 hour
Yield
Makes approximately 12 classic-sized donuts
Difficulty Level
Medium: Ideal for cooks willing to master dough handling and frying techniques
Ingredients
- 2 ½ cups bread flour, sifted
- 2 tablespoons granulated sugar
- 1 teaspoon salt
- 1 packet (2 ¼ teaspoons) active dry yeast
- ¾ cup whole milk, warmed to 110°F (43°C)
- 1 large egg, beaten
- 3 tablespoons unsalted butter, softened
- Vegetable or canola oil for frying
Instructions
- Activate the yeast: In a small bowl, combine the warmed milk and sugar. Sprinkle the yeast over the surface and let it sit for 5-7 minutes until foamy, signaling active yeast.
- Prepare dry ingredients: In a large mixing bowl, whisk together the bread flour and salt, ensuring even distribution.
- Combine wet and dry ingredients: Make a well in the flour mixture and pour in the yeast mixture and beaten egg. Using a wooden spoon or dough hook on low speed, mix until the dough starts to come together.
- Add the butter: Incorporate the softened butter gradually, kneading or mixing until the dough is smooth, elastic, and slightly tacky but not sticky (about 8-10 minutes).
- First rise: Transfer dough to a lightly greased bowl, cover with a clean kitchen towel, and let rise in a warm draft-free place for 60 minutes or until doubled in size.
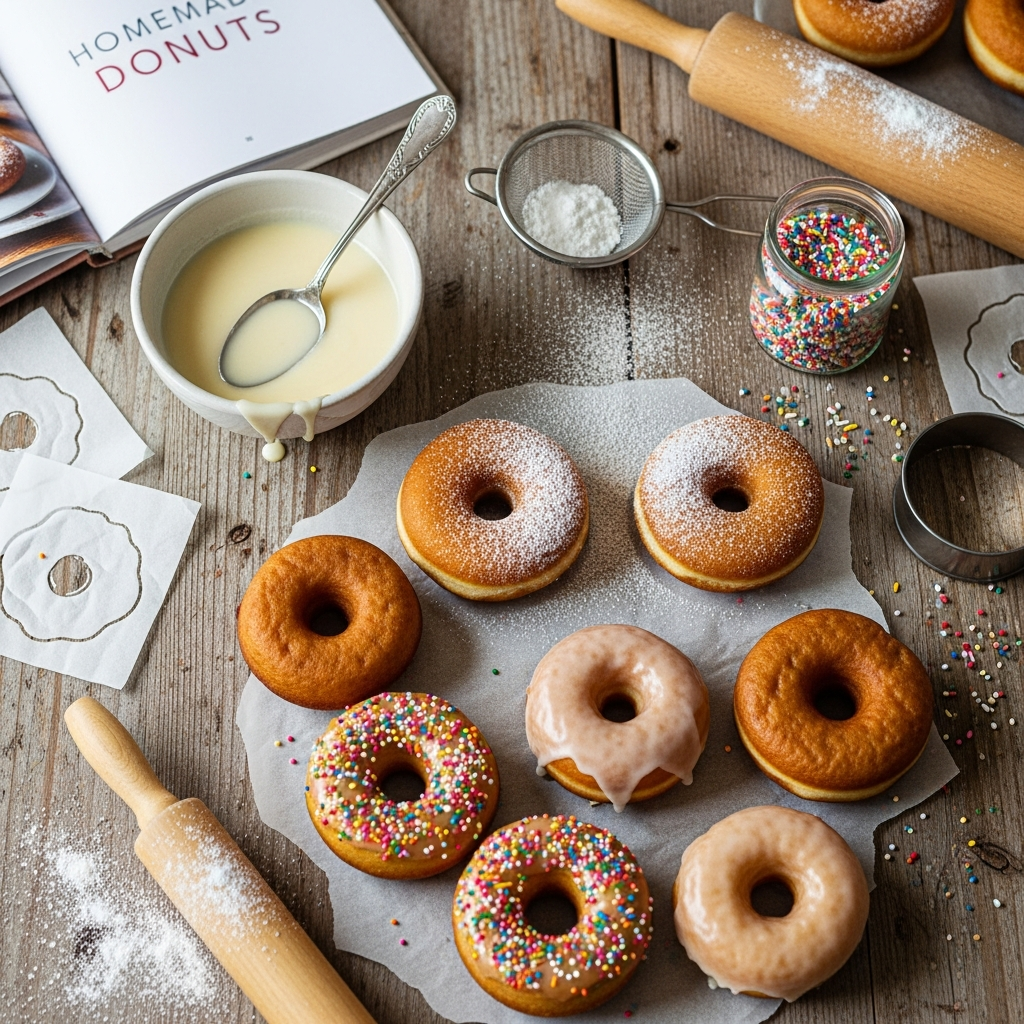
- Shape the donuts: Lightly flour a clean surface and roll the dough to ½-inch thickness. Using a donut cutter or two round cutters (one large, one small), cut donuts and holes. Place them on parchment-lined trays.
- Second rise: Cover shaped donuts lightly and let proof for 30-40 minutes until puffy and nearly doubled.
- Heat the oil: In a deep, heavy-bottomed pot or fryer, heat the oil to 350°F (175°C).Use a candy or deep-fry thermometer for precision to avoid greasy or undercooked doughnuts.
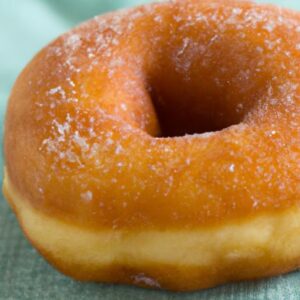
- fry the donuts: Gently slide 2-3 donuts at a time into the hot oil, frying for 1-2 minutes per side until golden brown. Flip carefully to ensure even cooking. Remove with a slotted spoon and drain on paper towels.
- Cool and decorate: Allow donuts to cool slightly before dipping into creative glazes or sprinkling with toppings of your choice.
Chef’s Notes: Tips for Success
- flour choice: Bread flour’s higher protein gives the dough the strength it needs; though, if unavailable, all-purpose flour can be substituted with slightly less liquid to maintain dough firmness.
- Milk temperature: Keep milk warm, not hot, to nurture yeast without killing it. Use a thermometer for accuracy.
- Kneading technique: Knead until the dough is smooth and elastic – a windowpane test is a useful benchmark.
- Oil temperature: Maintaining consistent 350°F prevents donuts from soaking oil or burning, ensuring golden perfection.
- Glaze power: Dip warm donuts in glaze for a glossy, perfect coating. add toppings immediately after for adhesion.
- Make-ahead: You can refrigerate shaped donuts for up to 12 hours before frying. Bring to room temperature and proof again before frying.
Serving Suggestions
Enjoy your donuts fresh and warm, accompanied by a steaming cup of coffee or rich hot chocolate. For elevated presentations, try thes ideas:
- Classic vanilla glaze with a sprinkle of crushed freeze-dried strawberries for tartness and texture.
- Decadent chocolate ganache glaze topped with toasted coconut flakes or chopped nuts.
- A light dusting of cinnamon sugar paired with a side of fresh berries to brighten each bite.
- For a playful treat, drizzle with homemade caramel sauce and a sprinkle of sea salt.
| Nutrient | Per Donut (Approx.) |
|---|---|
| calories | 220 kcal |
| Protein | 4 g |
| Carbohydrates | 28 g |
| Fat | 9 g |

Discover more about the science behind perfect dough on King Arthur Flour’s ingredient guide and explore our collection of homemade baked goods recipes for more artisan inspiration.
Q&A
Q&A: Deliciously simple - How to Make Homemade Donuts perfectly
Q1: What’s the secret to making homemade donuts soft and fluffy?
A1: The key lies in the dough’s hydration and yeast fermentation. Using warm milk or water helps activate the yeast, while giving the dough enough time to rise ensures it becomes light and airy. Don’t rush the proofing process-patience turns a simple dough into irresistibly fluffy donuts.
Q2: Can I make donuts without any special equipment?
A2: Absolutely! While a donut cutter makes shaping easier, you can use two round cookie cutters or even a drinking glass and a bottle cap to cut your donut and hole. For frying,a deep,heavy-bottomed pot and a thermometer to monitor oil temperature will do the trick.
Q3: How do I know when the oil is at the perfect temperature?
A3: Aim for about 350°F (175°C). If it’s too cool,the donuts will absorb oil and become greasy; too hot,and they’ll brown too quickly on the outside while remaining raw inside. Use a kitchen thermometer or drop a small piece of dough in the oil-if it bubbles and rises steadily without burning fast, you’re good to go.
Q4: What’s the best way to keep donuts fresh after frying?
A4: store them in an airtight container at room temperature. for optimal freshness, enjoy within 1-2 days. If you want to preserve them longer, freezing is your friend-freeze unglazed donuts in a single layer, then thaw before glazing or filling.
Q5: What are some flavorful homemade donut toppings or fillings?
A5: The possibilities are endless! Classic options include cinnamon sugar, powdered sugar, and chocolate glaze. For fillings, think vanilla custard, fruit jams, or rich cream cheese frosting. You can also get creative with sprinkles, nuts, or even a dusting of shredded coconut.
Q6: Can I bake donuts instead of frying them?
A6: Yes! Baked donuts offer a lighter,less oily alternative. use a donut pan and bake at around 375°F (190°C) for 10-12 minutes. Baking won’t give you that classic crispy exterior,but glazing or dusting with sugar still makes them absolutely delicious.
Q7: How do I achieve the classic donut shape at home?
A7: Shape is all about cutting! After rolling your dough to about ½ inch thickness, use a donut cutter or two nested round cutters.Keep your cuts clean and even; this ensures uniform cooking. If you want a rustic look, you can also hand-shape mini “donut holes.”
Q8: What dough ingredients make homemade donuts extra flavorful?
A8: Beyond the basics-flour, sugar, yeast, milk, and butter-adding a touch of vanilla extract or a pinch of nutmeg can elevate flavor beautifully.Don’t be afraid to experiment with citrus zest or a sprinkle of cinnamon right into the dough for a subtle yet delightful twist.
Q9: How can I tell when homemade donuts are properly cooked?
A9: They should be golden brown on both sides and puffed up nicely. When you tap them lightly, they feel springy, not dense. If you have a thermometer, the oil temperature and frying time (generally 1-2 minutes per side) will guide you to perfection.
Q10: What’s a simple glaze recipe for homemade donuts?
A10: For a classic glaze, mix powdered sugar with a splash of milk and a dash of vanilla extract until smooth. Dip warm donuts into the glaze and place them on a rack to set. The glaze hardens into a slightly crackly, sweet shell-pure nostalgia in every bite!
Enjoy your donut-making adventure-simple steps lead to deliciously perfect results every time!
Key Takeaways
Whether you’re a seasoned baker or a curious beginner, making homemade donuts is a joyful journey that combines simple ingredients with a sprinkle of creativity. With these easy-to-follow steps, you can transform your kitchen into a delightful donut shop, crafting treats that are warm, fresh, and irresistibly delicious.So next time the craving strikes, remember: the perfect homemade donut is just a mix, a rise, and a little love away. Happy baking-and even happier tasting!