


There’s somthing undeniably magical about the aroma of freshly fried donuts drifting through the kitchen-a warm, sweet invitation that promises comfort and delight in every bite. Homemade donuts transform a simple mix of flour, sugar, and love into golden rounds of pure bliss, inviting both novice bakers and seasoned sweet seekers to embark on a delicious adventure. In this sweet guide to perfect treats, we’ll dive into the art and science of crafting your very own donuts from scratch, unlocking tips, techniques, and creative twists that ensure every batch is as delightful as it is satisfying.Whether you crave classic cinnamon sugar or crave more daring flavors, prepare to roll up your sleeves and turn your kitchen into a donut haven.
Choosing the Finest Ingredients for Irresistible Flavor
Delicious homemade donuts start with the absolute best ingredients. To craft donuts that boast a tender crumb and irresistible aroma, prioritize high-quality all-purpose flour-sifted for lightness and uniform texture. Fresh yeast or active dry yeast is essential for a perfect rise; avoid old or expired yeast to ensure your dough puffs up beautifully. Whole milk enriches the dough, adding depth to every bite, and opt for unsalted butter to control your saltiness and add a subtle creaminess. When it comes to sweetening, pure granulated sugar creates a gentle sweetness that caramelizes wonderfully during frying. Don’t overlook the power of fresh large eggs to bind and energize your mixture. For that signature donut aroma, use a splash of pure vanilla extract and a pinch of fine sea salt to balance the sweetness.
Mastering the Art of Dough Planning and Rising Techniques
Creating the perfect dough begins with precise mixing and kneading. Combine your sifted flour with yeast and sugars first, then gradually introduce the warm milk and melted butter. Knead gently yet firmly on a lightly floured surface until the dough is smooth and elastic – this usually takes about 8-10 minutes. Proper kneading develops gluten, giving your donuts structure and chewiness. After shaping into a ball, transfer the dough to a clean, lightly oiled bowl. Cover it with a damp cloth or plastic wrap, allowing it to rise in a warm, draft-free spot until it has doubled in size-usually 1 to 1½ hours. Patience during this step is crucial; this fermentation creates the airy, tender crumb that makes homemade donuts heavenly. For a secondary proof after cutting the donut shapes, let them rest another 30 minutes before frying to maximize fluffiness.
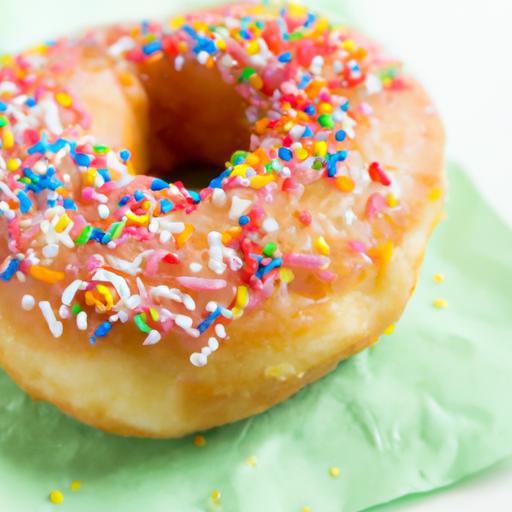
Creative Glazing and Topping Ideas to Elevate Your Donuts
Once your donuts have reached golden perfection, it’s time to unleash your creativity. Classic vanilla glaze made from powdered sugar and milk adds a smooth, shiny finish that melts in your mouth. For a colorful twist, try a tart raspberry glaze made from fresh puree and a touch of lemon juice for brightness. Sprinkle crushed toasted nuts like pistachios or almonds to introduce crunch and richness. For a fun and nostalgic touch, dip donuts in melted dark or white chocolate, adding shredded coconut or edible gold dust for a festive flair. Don’t forget powdered sugar and cinnamon sugar variations-they balance sweet and spice with a cozy finish. Use fresh berries or edible flowers as garnish for stunning presentation, making your donuts the centerpiece of any party.
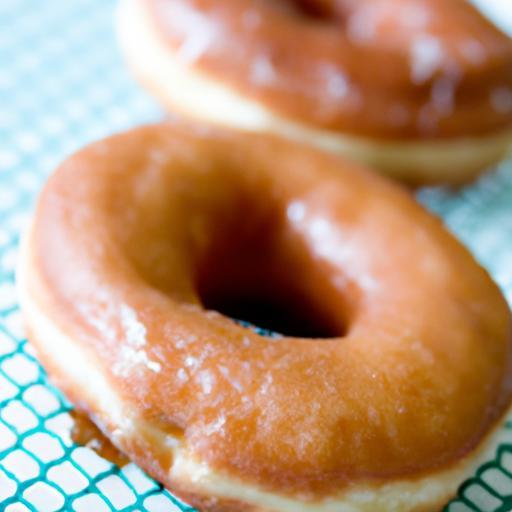
Perfecting the Frying process for Golden Crispy perfection
Achieving that ideal golden crust with a pillowy inside depends on frying technique. Use a heavy-bottomed pot or Dutch oven filled with at least 2 inches of neutral oil like vegetable or canola, heated to a steady 350°F (175°C).Maintaining the oil temperature is pivotal: too hot and your donuts will brown too fast but remain doughy inside; too cool and they’ll absorb excess oil and be greasy. Fry no more than 2-3 donuts at a time to keep the temperature consistent. Swap and flip gently with a slotted spoon, cooking each side for 1 to 1½ minutes until beautifully puffed and golden. Drain on paper towels promptly to shed excess oil but avoid stacking them, which can flatten the crust. With practice, frying donuts becomes an art of timing and gentle care, rewarding you with that coveted crisp exterior and soft, airy dough inside.
Prep and Cook time
- preparation: 25 minutes
- First Rise: 1 to 1½ hours
- Second Rise: 30 minutes
- Frying and Decorating: 20 minutes
- Total Time: Approximately 2 hours 15 minutes
Yield
Yields approximately 12 medium-sized donuts, perfect for sharing or indulging during your afternoon snack.
Difficulty Level
Medium – Ideal for home bakers with some experience but rewarding enough for beginners ready to master delightful homemade treats.
Ingredients
- 2 ½ cups all-purpose flour, sifted
- 2 ¼ tsp active dry yeast (1 packet)
- ½ cup whole milk, warmed (about 110°F)
- ¼ cup granulated sugar
- 3 tbsp unsalted butter, melted
- 2 large eggs, at room temperature
- 1 tsp pure vanilla extract
- ½ tsp fine sea salt
- Vegetable oil (for frying)
- Powdered sugar, cinnamon sugar, or glaze ingredients for topping
Instructions
- Activate the yeast: In a small bowl, stir the warm milk with 1 tablespoon of the sugar and yeast. Let stand 5-10 minutes until frothy and bubbly.
- Mix dry ingredients: In a large mixing bowl,whisk together sifted flour,remaining sugar,and sea salt to blend evenly.
- Combine wet ingredients: In a separate bowl, whisk eggs, melted butter, and vanilla extract.
- Form the dough: Create a well in the dry ingredients and pour in the yeast mixture and egg mixture. Stir until a shaggy dough forms.
- Knead: Turn the dough out onto a lightly floured surface and knead for 8-10 minutes until smooth and elastic. Add flour sparingly if sticky,but dough should remain soft.
- first rise: Place dough in a lightly oiled bowl,cover with a damp cloth,and let rise in a warm spot until doubled in size-about 1 to 1½ hours.
- Shape donuts: Roll dough to ½-inch thickness on a floured surface. Use donut cutters or a 3-inch round cutter plus a smaller hole to cut centers.
- Second rise: Place donuts on parchment-lined trays, cover loosely, and let rise 30 minutes until slightly puffed.
- Heat oil: Preheat oil in a heavy pot to 350°F (175°C).Use a thermometer for accuracy.
- Fry donuts: Carefully lower 2-3 donuts into the hot oil. Fry for 1-1½ minutes per side until golden and puffed. Use a slotted spoon to flip gently.
- Drain: Remove fried donuts and drain on paper towels. Avoid stacking to preserve crispness.
- Glaze and garnish: While warm, dip in glaze or sprinkle with sugar/toppings of choice.
Tips for Success
- for a lighter crumb, always weigh your flour if possible. Scooping can compact it, throwing off hydration.
- If you don’t have a thermometer, test oil temperature by dropping a small piece of dough-if it bubbles and rises steadily, it’s ready.
- Don’t rush the rising stages; the flavor and texture deepen with proper fermentation.
- Leftover donuts can be reheated in a warm oven for a few minutes to revive crispness.
- Try substituting half the all-purpose flour with bread flour for chewier donuts.
Serving Suggestions
Serve your donuts warm with a side of fresh fruit or a steaming cup of rich coffee or tea. Garnish with edible flowers or a light dusting of powdered sugar for a café-style touch.Create a donut platter with an assortment of glazes, sprinkles, and nuts-perfect for sharing at brunch or celebrations. For an indulgent treat, layer sliced donuts with whipped cream and berries for a stunning quick trifle.
| Nutrient | Per Donut (Approx.) |
|---|---|
| Calories | 210 kcal |
| Protein | 4 g |
| Carbohydrates | 26 g |
| Fat | 10 g |
Discover more quick glazed donut recipes hear and for detailed yeast preparation techniques, visit King Arthur Baking’s expert guide.

Q&A
Q&A: Delicious homemade Donuts: A Sweet Guide to Perfect Treats
Q1: What makes homemade donuts different from store-bought ones?
A: Homemade donuts carry the magic of fresh ingredients and personalized touches. Unlike store-bought varieties that often rely on preservatives, homemade donuts burst with vibrant flavors and a fluffy texture you can tailor – from classic glazed to creatively filled or frosted. Baking or frying them in your own kitchen lets you control sweetness, spice, and even the shape, making each bite uniquely yours.Q2: Do I need special equipment to make donuts at home?
A: While a donut cutter simplifies the classic ring shapes, you can get creative with cookie cutters, glass rims, or even freeform shapes. A deep fryer works well, but a heavy-bottomed pot or deep skillet will do the trick for frying. For baked donuts, a simple donut pan delivers an evenly cooked, lighter version. The key is consistent oil temperature and patience!
Q3: What type of flour is best for donut dough?
A: All-purpose flour is your trusty companion for conventional donuts, offering the right balance of structure and tenderness. For an extra fluffy bite, some bakers blend in a bit of cake flour. If you want to experiment, whole wheat flour adds a nutty depth but may yield a denser donut, so consider mixing it with all-purpose for the best of both worlds.
Q4: How do I achieve a perfectly light and airy donut?
A: Tricks of the trade include using fresh yeast or a reliable baking powder, not overmixing the dough, and allowing it ample time to rise. The proofing phase is like a donut’s beauty sleep, where bubbles form and lift the dough. Also,frying at the right temperature – usually around 350°F (175°C) – creates that irresistible golden crust while trapping moisture inside.
Q5: What are some creative filling ideas beyond the classic jelly or custard?
A: Beyond the usual, try luscious lemon curd for a tangy twist, chocolate ganache for a rich surprise, or even a coconut cream filling for tropical flair. For a refreshing burst, consider fresh fruit compotes like blueberry or mango. Don’t shy away from experimenting with nut butters or flavored creams for a gourmet touch!
Q6: Can I make donuts in advance, or are they best fresh?
A: Donuts truly shine fresh out of the frying oil or oven - warm, fluffy, and tender. However, you can absolutely prepare dough ahead of time; refrigerate it covered overnight to develop flavor. For leftover donuts, storing them in an airtight container at room temperature preserves softness for a day or two. To revive them, a quick zap in the microwave or a gentle toast can restore some of that fresh-baked charm.
Q7: What are some popular toppings to elevate homemade donuts?
A: The sky’s the limit! Classic choices like powdered sugar, cinnamon sugar, or vanilla glaze provide simple sweetness. For more flair,drizzle with caramel,sprinkle chopped nuts,or scatter colorful sprinkles and edible glitter. Fresh zest – lemon or orange – can add a zingy aroma, while toasted coconut flakes bring crunch and tropical vibes that delight both eyes and taste buds.
Q8: How can I make allergen-friendly donuts?
A: For gluten-sensitive friends, gluten-free flour blends crafted for baking work wonderfully. Dairy-free donuts can be made by swapping milk for almond, oat, or coconut milk, and using oils rather of butter.Eggs can be replaced with flaxseed or chia “eggs” (a tablespoon of ground seeds mixed with three tablespoons of water) to keep the dough binding well. The key is to experiment and enjoy the revelation of delicious alternatives.
Q9: What’s the best way to store leftover donut glaze or frosting?
A: Store your glaze or frosting in a tightly sealed container in the refrigerator. Most glazes keep well for up to a week; before using, gently warm or stir them to restore smoothness. For thicker frostings, slightly loosening with a splash of milk or water helps regain that perfect spreadable consistency.
Q10: Any insider tips for mastering the perfect donut texture?
A: Absolutely! Be mindful of your dough’s hydration – it should feel soft but not sticky. Don’t rush proofing; patience helps develop flavor and texture. When frying, avoid overcrowding the pan to maintain consistent oil temperature. Lastly, draining donuts on paper towels or a wire rack prevents sogginess, keeping that crisp-then-soft contrast that makes donuts utterly addictive.
Wrapping Up
As you embark on your homemade donut adventure, remember that each batch is a canvas-waiting for your unique touch of flavor, glaze, and sprinkle.With the tips and techniques shared in this sweet guide, you’re well-equipped to transform simple ingredients into golden, fluffy delights that rival any bakery’s finest. So don your apron, embrace the joy of the doughy dance, and savor the irresistible magic of homemade donuts-as every perfect treat starts right in your own kitchen. Happy frying, and sweeter days ahead!