


Imagine indulging in a luxuriously smooth, tropical dessert that melts effortlessly on your tongue-all whipped up quickly with the help of your trusty pressure cooker. Say goodbye to sticky stovetop séances and lengthy chilling times; with a little ingenuity and the magic of pressure cooking, you can create a luscious coconut mousse that’s both rich and airy in a fraction of the usual time. Whether you’re craving a decadent finish to a weeknight dinner or an impressive treat for guests, this creamy coconut mousse recipe promises simplicity, speed, and sensational flavor-all packed into one pressure cooker adventure. Let’s dive into the art of crafting this delightful dessert that redefines convenience without compromising on indulgence.
Whip up Creamy Coconut Mousse in Your Pressure Cooker! Nothing compares to the luxe texture and tropical richness of a coconut mousse that’s been perfected through gentle pressure cooker magic. This luscious dessert, inspired by Southeast Asian coconut traditions, brings an irresistibly smooth and airy finish that melts effortlessly on your tongue. Whether you’re a seasoned cook or an adventurous beginner, mastering the essentials of this recipe will elevate your culinary repertoire with a crowd-pleasing delight.
Essentials for Achieving Silky Smooth Coconut Mousse Texture
Achieving the ideal silkiness in your coconut mousse hinges on three key factors: ingredient quality, precise technique, and temperature control. Opt for full-fat coconut milk or cream with no additives for a naturally creamy base. The higher the fat content, the richer and silkier your mousse will be. Incorporating a subtle touch of natural sweeteners like coconut sugar or organic maple syrup enhances the delicate coconut aroma without overpowering it.
Blending the mixture thoroughly before cooking creates an ultrafine consistency, while pressure cooking ensures even heat infusion, breaking down the coconut solids into a velvety cloud of flavor. Timing is critical; overcooking can cause separation, whereas undercooking leaves it grainy. lastly, chilling the mousse properly post-pressure cooking allows it to set into that perfect airy texture.
Choosing the Perfect Coconut Ingredients for Rich Flavor
Select the right coconut products with care to unlock the full essence you crave. Look for:
- Canned Full-Fat Coconut Milk: Choose BPA-free cans with at least 17-20% fat for creaminess.
- Coconut Cream: Thicker than milk, this adds luxurious body; great for folding into mousse.
- Unsweetened Coconut Flakes or Desiccated Coconut: Optional, for subtle texture contrast or garnish.
- Natural Sweeteners: Coconut sugar or maple syrup blend harmoniously instead of refined sugars.
- freshly Grated Lime Zest or Vanilla bean: To brighten and deepen complexity.
Using authentic and minimally processed coconut ingredients makes all the difference between an average mousse and a truly memorable dessert.
Step by Step Guide to pressure Cooker Magic for mousse Perfection
- Prepare your mixture: In a blender, combine 400ml of full-fat coconut milk, 60g coconut sugar, a pinch of salt, and a teaspoon of vanilla extract until silky smooth.
- Transfer to a heatproof dish: Use a shallow ceramic or stainless steel container to ensure even cooking inside your pressure cooker.
- Add water to pressure cooker: Pour about 1 cup of water into the cooker base, keeping the dish elevated on a trivet or steam rack.
- Seal and cook: Lock the lid and set your pressure cooker to low pressure for precisely 15 minutes. This gentle cooking intensifies flavors and develops a mousse-like texture without curdling.
- Natural Pressure Release: Let the pressure release naturally for 10 minutes before carefully opening the lid – abrupt cooling disrupts the mousse’s silkiness.
- Chill thoroughly: Transfer the mousse to the fridge for at least 4 hours or overnight.The cold sets the mousse firmly while preserving its light, airy mouthfeel.
Pro tip: Avoid stirring promptly after cooking; patience allows the mousse to settle into its luscious form.
Expert Tips for serving and Storing Your Coconut Delight
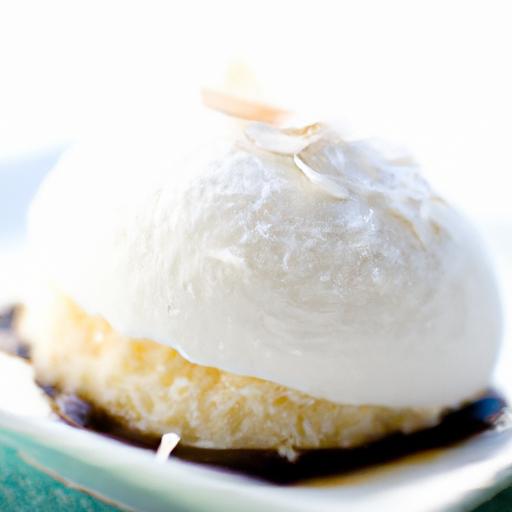
Present your coconut mousse with flair by spooning it into elegant glasses or ramekins. Garnish beautifully with toasted coconut flakes, a sprig of fresh mint, or vibrant tropical fruits like passionfruit pulp or mango salsa-these add contrast in color and texture that dazzles the senses.
For storing, keep your mousse in an airtight container in the refrigerator for up to 3 days. Avoid freezing as it may alter the smooth texture. To retain the freshest flavor, add garnishes just before serving.
Want to elevate the experience? Pair it with crunchy almond biscotti or drizzle lightly with dark chocolate sauce for a sublime balance of richness and texture.
Prep and Cook Time
- Prep: 10 minutes
- Cook: 25 minutes (including pressure cooking and pressure release)
- Chill: 4 hours minimum (preferably overnight)
Yield

Serves 4 elegant portions
Difficulty Level
Easy to Medium – Perfect for home cooks ready to explore pressure cooker desserts
Ingredients
- 400ml canned full-fat coconut milk, well-shaken
- 60g coconut sugar (or organic maple syrup as alternative)
- 1 tsp pure vanilla extract or seeds from ½ vanilla bean
- Pinch of fine sea salt
- 1 tbsp freshly grated lime zest (optional for brightness)
- Toasted coconut flakes for garnish
- Fresh mint leaves for garnish
Instructions
- Blend the base: Pour coconut milk into a blender with coconut sugar, vanilla, salt, and lime zest. Blend on high for 1 minute until completely smooth and creamy.
- Prepare pressure cooker: Pour 1 cup of water into the bottom of the pressure cooker.Place the trivet inside and then your heatproof mixing bowl on top of the trivet.
- Transfer mixture: Carefully pour the blended coconut mix into the bowl in the cooker,spreading evenly.
- Seal and cook: Close the lid, set to low pressure, and cook for 15 minutes. Use natural release for 10 minutes to prevent texture disruption.
- Cool down: Remove the mousse from the cooker and transfer to serving containers if desired. Chill in the refrigerator for at least 4 hours.
- Garnish and serve: Just before serving, sprinkle with toasted coconut flakes and fresh mint for a vibrant presentation.
Chef’s Notes
- For a lighter variation, replace half the coconut milk with unsweetened almond milk, but expect a slightly less creamy result.
- If your mousse seems too dense after chilling, whisk gently with a hand mixer just before serving to reinstate the airy texture.
- This mousse is naturally vegan and gluten-free, making it ideal for special diets.
- Use BPA-free cans to avoid any off-flavors from packaging.
- To make ahead: Prepare and cook the mousse up to 2 days in advance, keeping it chilled until ready to garnish and enjoy.
serving Suggestions
- Serve in clear glass cups layered with fresh diced mango and a drizzle of passionfruit pulp for tropical flair.
- add a crunchy almond praline on top for texture contrast and nutty depth.
- Pair with a light, aromatic jasmine tea or sparkling coconut water.
| Nutrient | Per Serving |
|---|---|
| Calories | 250 kcal |
| Protein | 2 g |
| Carbohydrates | 18 g |
| Fat | 20 g |
For extra inspiration on coconut-based desserts, check out our tropical fruit Dessert Recipes. For a deeper dive into pressure cooking techniques, consult this complete guide at Serious Eats.

Q&A
Q&A: Whip Up creamy Coconut Mousse in Your Pressure Cooker!
Q1: Can I really make a delicate, creamy coconut mousse in a pressure cooker?
A1: Absolutely! Your pressure cooker is not just for savory stews-it’s perfect for gently cooking coconut cream with just the right amount of heat and steam to achieve a luxuriously smooth and airy mousse. The controlled environment helps blend flavors effortlessly while saving you time.
Q2: What ingredients do I need to create the perfect coconut mousse in a pressure cooker?
A2: The star ingredient is full-fat coconut milk or cream for that rich, tropical foundation. Pair it with natural sweeteners like maple syrup or agave, a splash of vanilla extract for warmth, and a pinch of salt to balance sweetness. You can even fold in freshly whipped coconut cream or chilled cream to elevate the mousse’s fluffiness.
Q3: How does the pressure cooker affect the texture of the coconut mousse?
A3: The gentle steaming environment of the pressure cooker softens the coconut cream uniformly, breaking down any graininess and allowing the mousse to develop its signature silky texture. This method gives the dessert a wonderfully light mouthfeel that might take hours to achieve with traditional methods.
Q4: Are there any tips to ensure the mousse sets perfectly after cooking?
A4: Yes! After cooking in the pressure cooker, allow the mousse base to cool a bit before folding in whipped elements. Then, chill the mixture in the refrigerator for at least 3-4 hours or overnight. This chilling period is crucial for the mousse to firm up into a creamy, scoopable delight.Q5: Can I add flavors or toppings to customize my coconut mousse?
A5: Without a doubt! Coconut mousse is incredibly versatile. Consider infusing your mixture with freshly grated lime zest or a sprinkle of cinnamon before cooking. Once set, you can top with toasted coconut flakes, fresh berries, or a drizzle of passion fruit syrup to add pops of color and flavor.
Q6: Is this recipe suitable for those with dietary restrictions?
A6: Definitely.Coconut mousse made in a pressure cooker is naturally dairy-free, gluten-free, and vegan-friendly if you use plant-based sweeteners and cream. It’s a delightful dessert that fits many dietary lifestyles while still satisfying your sweet tooth.
Q7: What’s the best way to serve this coconut mousse?
A7: Serve it chilled in elegant glassware for a elegant dessert presentation. Garnish with a sprig of mint, a dusting of coconut powder, or even edible flowers to wow your guests with both taste and aesthetics. It’s perfect for summer gatherings or as a soothing end to any meal!
The Conclusion
There you have it-a luscious, creamy coconut mousse whipped up effortlessly in your pressure cooker! This delightful dessert proves that indulgence doesn’t have to be complex or time-consuming.With just a few simple ingredients and the magic of pressure cooking, you can transform your kitchen into a tropical escape.So next time the sweet tooth strikes, skip the oven and let your pressure cooker do the work-your taste buds will thank you!