


Step into the enchanting world of chewy, pillowy delights with “Master mochi Magic: Your Ultimate DIY Mochi Kit Guide.” Whether you’re a curious kitchen crusader or a dessert devotee, this guide unwraps the secrets behind crafting perfect mochi right at home. From selecting the ideal ingredients to mastering the art of shaping these sweet, stretchy treats, get ready to transform your countertop into a mochi-making haven. Dive in, and let the magic of mochi elevate your culinary creativity!
Master Mochi Magic starts with an intimate understanding of the delicate balance between chewiness and subtle sweetness that makes mochi a beloved treat worldwide. This soft, pillowy Japanese rice cake has roots steeped in tradition, yet its irresistible texture and flavor invite endless innovation. Whether you’re a seasoned pro or a curious beginner, unlocking the secrets of mochi’s flawless texture will elevate your homemade creations to tantalizing new heights.
Prep and Cook Time
- Readiness: 20 minutes
- Cooking: 15 minutes
- total Time: 35 minutes
Yield
Makes approximately 12 mochi pieces.
Difficulty Level
Medium – Perfect for adventurous home cooks ready to master texture and technique.
Essential Tools and Ingredients for the Perfect mochi experience
- 1 cup glutinous rice flour (mochiko), sifted
- 3/4 cup water (room temperature)
- 1/4 cup granulated sugar
- Cornstarch or potato starch for dusting
- Microwave-safe bowl or steamer
- Plastic wrap to cover dough while steaming or microwaving
- Rubber spatula or wooden spoon
- Rolling pin (optional) for shaping
- Small cookie cutter or sharp knife for portioning
Step-by-Step Mochi Crafting Techniques to Elevate Your DIY Kit
- Combine glutinous rice flour, sugar, and water in your microwave-safe bowl. Stir vigorously until the mixture is smooth and free of lumps; this ensures an even, chewy mochi base.
- Cover the bowl with plastic wrap, leaving a small vent to release steam. Microwave on high for 1 minute, then remove carefully; the mix will begin to gelatinize.
- Stir vigorously using a rubber spatula to distribute heat evenly. Cover and microwave another 1 minute. Repeat this process one more time until the dough appears translucent and sticky.
- Dust your work surface generously with cornstarch or potato starch. Turn out the mochi dough onto the surface – it will be hot and very sticky,so dust your hands well.
- Using a rolling pin dusted with starch, gently flatten the dough into a 1/4-inch thick rectangle. If you prefer freeform mochi,simply pinch off bite-sized pieces.
- Cut the mochi into desired shapes, typically small squares or circles, using a cookie cutter or sharp knife. Dust each piece to prevent sticking.
- If making filled mochi, place a small spoonful of filling in the center of each piece. Lightly stretch and fold the edges over the filling, pinching closed to seal perfectly.
- Chill mochi in the refrigerator for 15 minutes to firm up before serving or decorating.
Creative Filling Ideas and Presentation Tips for Mochi Mastery
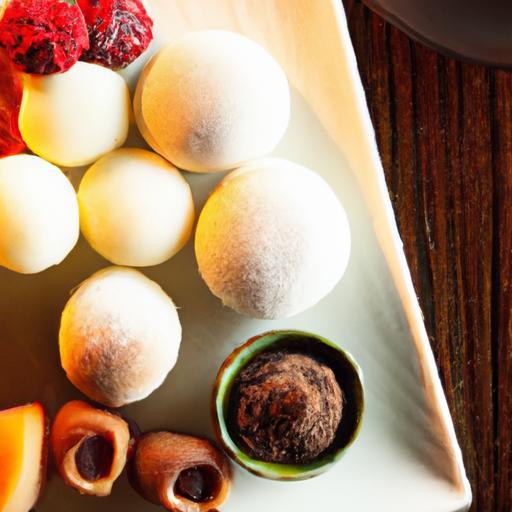
Unleash your culinary creativity by experimenting with fillings. Customary sweet red bean paste (anko) offers authentic flavor and richness, while fresh fruit pieces like strawberries or mango add refreshing contrast. For something playful, try sweetened matcha cream or chocolate ganache. Vegan coconut custard also makes a luscious surprise.
Presentation is key to mochi mastery. Serve on a dark wooden plate or bamboo tray with delicate edible flowers or toasted sesame seeds for color and texture.Sprinkle a light dusting of powdered sugar or kinako (roasted soybean flour) for refined notes.Pair with a cup of green tea to balance sweetness and cleanse the palate.
Tips for Success
- Work quickly when handling mochi dough,as it becomes more arduous to shape once cooled.
- Keep surfaces and hands well-dusted with starch to prevent sticking without altering texture.
- For softer mochi, add a teaspoon of vegetable oil to the dough mixture before cooking.
- Use room-temperature water to help the flour hydrate evenly, preventing lumps and gummy spots.
- Experiment with steaming instead of microwaving: steam dough for about 15 minutes until translucent for a traditional method.
- Mochi freezes well; wrap tightly in plastic wrap and store in an airtight container for up to one month.
Serving Suggestions
Display your mochi on a simple ceramic plate dusted lightly with starch. Gently press a tiny edible gold leaf or sprinkle toasted coconut flakes on top to add elegance. Arrange contrasting colored mochi pieces in a circular pattern to highlight variety and craftsmanship. Serve alongside a chilled cup of matcha or jasmine tea, and encourage guests to savor the delightful chew and sweet surprises within.
| Nutrient | Per Piece (approx.) |
|---|---|
| Calories | 90 kcal |
| Protein | 1.2 g |
| Carbohydrates | 22 g |
| Fat | 0.2 g |

Discover more on advanced mochi recipes and creative Asian desserts in our Asian Desserts Guide. For an in-depth look at the science of rice cakes, check out Serious Eats: the Science of Mochi.
Q&A
Q&A: Master Mochi Magic: Your Ultimate DIY Mochi Kit Guide
Q1: What exactly is mochi, and why is it so beloved around the world?
A: Mochi is a chewy, tender japanese rice cake made from glutinous rice pounded into a smooth, sticky dough. Its unique texture-soft yet springy-makes it a delightful treat, perfect for both sweet and savory creations. Beyond its taste, mochi carries cultural meaning, symbolizing good fortune and festivity, which adds a sprinkle of magic to every bite.
Q2: What comes in a typical DIY mochi kit?
A: Most DIY mochi kits include pre-measured glutinous rice flour or mochiko, a sweetener like sugar, starch or cornflour to prevent sticking, and sometimes a rolling tool or molds.Some kits even provide a variety of fillings-think fruity jams, red bean paste, or sweetened black sesame-empowering you to personalize your mochi masterpieces.
Q3: Do I need any special equipment to make mochi at home?
A: The beauty of a good DIY mochi kit is its simplicity-no fancy machinery required! Usually, you’ll only need a microwave or stove to cook the mochi dough, a bowl, a spatula, and your hands for gentle shaping. Dust your workspace with starch to keep things from sticking, and you’re ready to start crafting your chewy confections!
Q4: Can I customize the flavors and fillings in my mochi?
A: Absolutely! Mochi is a versatile canvas. Sweet fillings like fresh fruit, chocolate, or sweetened beans are classic choices, while savory enthusiasts can experiment with ingredients like tofu, mushrooms, or even spicy edamame. the key is to keep fillings moist but not watery,maintaining that perfect balance of texture and flavor.
Q5: how do I store my homemade mochi to keep it fresh and chewy?
A: Fresh mochi is best enjoyed the day it’s made, but if you need to store it, wrap each piece tightly in plastic wrap to lock in moisture and keep them in the fridge for up to two days. Before eating, let mochi come to room temperature to regain its signature softness. for longer storage, freeze them individually and thaw gently-though texture may soften slightly.
Q6: What are some creative ways to serve or enjoy mochi?
A: Mochi shines in many forms! Try dusting it with kinako (roasted soybean flour) or matcha powder for a nutty, fragrant finish. Slice mochi into cubes and toast them lightly for a crunchy exterior, or skewer pieces for a fun, dango-inspired treat. Pair mochi with green tea or a drizzle of honey for a simple yet elegant dessert.Q7: What tips will help me avoid common mochi-making mishaps?
A: Stick to the recipe measurements-to much water can make your dough overly sticky, while too little produces tough mochi. Work quickly to shape mochi before it cools and stiffens. Also, keep your hands and utensils dusted with starch to prevent sticking. With patience and a little practice, your mochi texture will be irresistibly perfect!
Q8: Can children safely participate in making mochi at home?
A: Definitely! Mochi-making is a fun, hands-on activity that kids love. Adult supervision is key during cooking steps,but shaping and filling mochi are great for little hands and creative minds. It’s a marvelous way to introduce children to culture, cooking skills, and the joy of homemade treats.
Ready to embark on your mochi adventure? With these insights and a trusty DIY kit, you’re well on your way to mastering the magical art of mochi making-one chewy, delightful piece at a time!
The Conclusion
As you venture into the delightful world of mochi-making, armed with your ultimate DIY mochi kit, remember that each step is a dance between tradition and creativity. Whether you’re shaping soft, pillowy treats or experimenting with vibrant fillings, mastering mochi magic is as much about enjoying the process as savoring the final bite. So gather your ingredients, unleash your inventiveness, and let every mochi you craft become a sweet celebration of culture, craft, and homemade joy. Your mochi adventure awaits-ready to be rolled, filled, and shared!