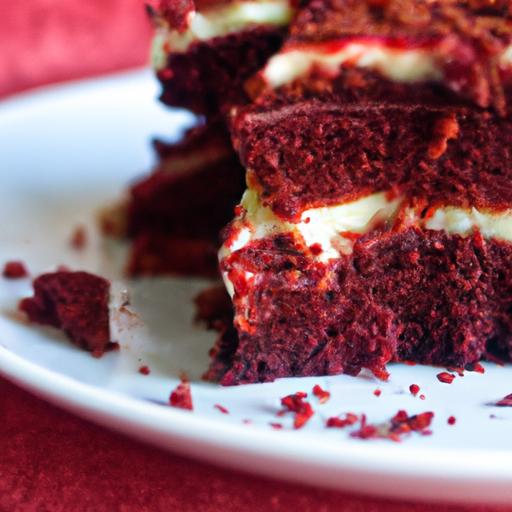

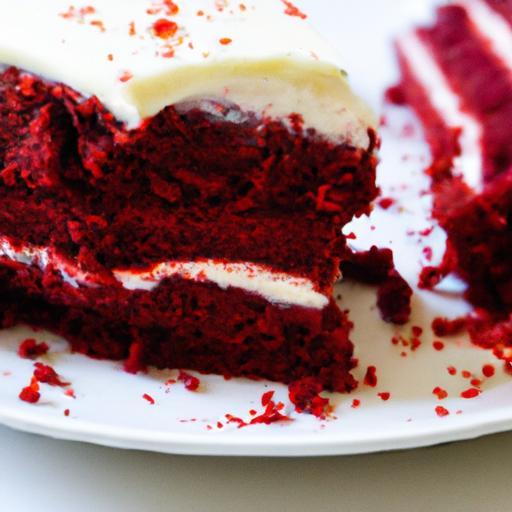
imagine sinking your fork into a cake so moist, tender, and vibrant that it makes your taste buds dance-a classic red velvet, but faster, fluffier, and effortlessly perfect.welcome to the world of pressure cooker baking, where kitchen magic happens in a fraction of the time without sacrificing an ounce of texture or flavor. In this article, we’ll unlock the secrets to mastering red velvet cake using a pressure cooker, transforming a traditionally time-consuming dessert into a quick, foolproof masterpiece. Whether you’re a baking novice or a seasoned pro pressed for time, get ready to discover how this innovative method delivers that iconic, velvety crumb every time.
Choosing the perfect Ingredients for Ultimate Moisture and Flavor
Quick & Fluffy: Mastering Pressure Cooker Red Velvet Cake starts with selecting ingredients that will guarantee a tender crumb and vibrant flavor with every bite. The magic lies not only in the red hue but in how each component enhances moisture and depth.Opt for buttermilk to introduce a subtle tang and keep the crumb soft, while cake flour with its lower protein content helps create the delicate fluffiness pressure cooking demands. Pure vanilla extract elevates the sweetness profile, marrying perfectly with a hint of cocoa powder that delivers just the right amount of chocolatey warmth without overpowering the iconic flavor. High-quality natural food coloring ensures a brilliant scarlet tone that’s as visually exciting as the taste.
For ultimate moisture, never underestimate the power of freshly ground cornstarch or a splash of vegetable oil. Thes liquid fats distribute evenly through the batter, locking in softness that pressure cooking intensifies.When you combine baking soda and a small amount of vinegar, you create a gentle leavening reaction, which lifts the cake within your pressure cooker to unparalleled fluffiness.
Unlocking the Secrets to Achieving Fluffy texture in a Pressure Cooker
Hidden behind the smooth exterior of your red velvet cake is the science of pressure and steam working together to create a moist, air-rich crumb unlike traditional oven baking. The secret to success is balancing moisture and lift in the batter with the precision settings of your pressure cooker.
Start by preheating your pressure cooker with a water base to generate consistent steam. Use an appropriately sized, greased and parchment-lined cake pan to prevent sticking and help the cake rise evenly. To ensure fluffiness, sift your dry ingredients before folding them gently into the wet mixture to avoid degassing the batter. Adding a touch of cornstarch acts as a tenderizing agent, preventing excessive firmness that sometimes happens under pressure cooking.
Timing is key: too long under pressure can dry the cake, while too little results in undercooked batter.Adjust your pressure cooker’s settings based on its make and model but aim for moderate pressure and gradual natural release to preserve a light texture.
Step by Step Guide to Balancing Baking Time and Pressure Settings
- Prepare your pressure cooker: Add 1 to 1.5 cups of hot water to the base and place a trivet or rack inside to elevate the cake pan above the water level.
- Mix batter carefully: Combine dry ingredients in one bowl and wet ingredients in another; gently fold them together until just combined to avoid toughening.
- Pour & cover: Transfer batter into a greased and parchment-lined pan that fits snugly in your cooker. Cover tightly with foil to prevent moisture dripping.
- Seal & set pressure: Lock the lid and set your cooker to medium pressure (typically “Low” or around 6-7 psi).
- Cook for 30-35 minutes: The exact time depends on your cooker’s power and cake thickness; begin checking doneness at 30 minutes using a skewer.
- Natural release for 10 minutes: Let the pressure release slowly, allowing the cake to finish setting and avoid shrinkage or cracks.
- cool before removing: Allow the cake to cool in the pan for 15 minutes before transferring to a wire rack for full cooling.
Creative Frosting Ideas to Complement Your Red Velvet Masterpiece
While the traditional cream cheese frosting is an all-time classic for red velvet, exploring creative variations can elevate your masterpiece even further. For a richer texture, whip softened cream cheese with room temperature unsalted butter, a hint of lemon zest, and a splash of vanilla bean paste.
For a lighter twist,try folding Greek yogurt or mascarpone into the frosting,adding tangy brightness without heaviness. A drizzle of homemade dark chocolate ganache or a sprinkle of crushed toasted pecans adds a textural contrast that’s stunning on photo and palate alike.
If you want to step outside the box, a whipped coconut cream frosting infused with a dash of cinnamon or espresso powder pairs beautifully with the cake’s soft cocoa notes, offering a dairy-free choice that’s fluffy and indulgent.
Prep and cook Time
- Planning: 15 minutes
- Cooking: 35 minutes
- Cooling: 30 minutes
- Total Time: 1 hour 20 minutes
Yield
- One 8-inch cake (serves 8-10)
Difficulty level
- Medium – beginner-kind with guided pressure cooker techniques
Ingredients
- 1 ½ cups cake flour, sifted
- 1 cup granulated sugar
- 1 tablespoon unsweetened cocoa powder
- ½ teaspoon baking soda
- ½ teaspoon fine salt
- 1 cup buttermilk, room temperature
- 2 large eggs, room temperature
- ½ cup vegetable oil
- 1 teaspoon pure vanilla extract
- 1 tablespoon apple cider vinegar
- 2 teaspoons natural red food coloring
Instructions
- Grease and line the cake pan: Lightly oil an 8-inch cake pan and place a parchment circle inside.This ensures easy removal post-cooking.
- Sift dry ingredients: in a large bowl, sift together cake flour, cocoa powder, baking soda, and salt to aerate and remove lumps.
- Mix wet ingredients: In another bowl, whisk buttermilk, eggs, oil, vanilla, vinegar, and red food coloring until smooth and uniform in color.
- combine gently: Pour wet ingredients into the dry mix and fold gently with a spatula until just combined. Avoid overmixing to maintain fluffiness.
- Transfer batter: Pour the batter into your prepared pan,smoothing the top with the spatula.
- Set up pressure cooker: Pour 1.5 cups hot water into the pressure cooker base and place the trivet inside.
- Place cake pan: Set the cake pan on the trivet. Cover the pan tightly with two layers of foil.
- Cook under pressure: Seal the cooker lid, set to medium pressure, and cook for 30-35 minutes.
- Natural release: After cooking, let pressure release naturally for 10 minutes before opening the lid carefully.
- Cool and remove: Let the cake cool in the pan for 15 minutes; then invert onto a wire rack to cool completely before frosting.
Tips for Success
- Use room temperature ingredients: This helps the batter blend evenly and promotes an airy texture.
- Avoid lifting the lid prematurely: Pressure fluctuations can cause the cake to deflate or crack.
- Test doneness: Insert a toothpick in the center; it should come out mostly clean with a few moist crumbs.
- Substitute buttermilk: Mix 1 cup milk with 1 tablespoon white vinegar; let it sit 5 minutes to curdle if you don’t have buttermilk.
- Make ahead: Bake the cake a day prior and store wrapped tightly; frost and garnish just before serving.
Serving Suggestions
Slice your red velvet cake into generous wedges, displaying its vibrant red crumb. Complement it with a smooth cream cheese frosting, applying thick, even layers. Garnish with edible rose petals or fresh berries for a romantic flair. For added texture, sprinkle lightly toasted chopped walnuts or pecans on top. Serve with a chilled glass of vanilla almond milk or freshly brewed coffee for a cozy indulgence.
| Nutrient | Per Serving |
|---|---|
| Calories | 320 kcal |
| Protein | 4 g |
| Carbohydrates | 40 g |
| Fat | 16 g |

Discover more about pressure cooking techniques in our Pressure Cooker Dessert Recipes and enhance your baking skills. For detailed science on ingredient reactions,check out Serious Eats on Pressure Cooker Baking.
Q&A
Q&A: Quick & Fluffy – Mastering Pressure Cooker Red Velvet Cake
Q1: Why choose a pressure cooker for baking Red Velvet Cake?
A1: Using a pressure cooker transforms traditional baking by delivering moist heat evenly and swiftly. This method cuts down baking time dramatically while preserving the cake’s signature tender crumb and vibrant red hue. Plus, it’s perfect for those without an oven or when you crave a quick homemade treat!
Q2: How does the texture of a pressure cooker Red velvet Cake compare to a traditionally baked one?
A2: Pressure cooker cakes often come out incredibly moist and fluffy due to the sealed steaming surroundings, which traps moisture better than dry oven heat. Expect a tender crumb that practically melts in your mouth, without drying edges.
Q3: Do I need special ingredients for pressure cooker Red Velvet Cake?
A3: No special ingredients are necessary! Just stick to classic red Velvet staples: cocoa powder, buttermilk (or a tangy substitute), vinegar, baking soda, and red food coloring. It’s best to use fresh ingredients for optimal rise and flavor.
Q4: What’s the secret to getting the perfect rise in a pressure cooker cake?
A4: The key is balancing the chemical leaveners and ensuring the batter is well mixed but not overworked. Using fresh baking soda and vinegar creates reaction that helps the cake rise beautifully under pressure. Also,don’t forget to grease your pan to avoid sticking!
Q5: Can I use any pressure cooker for this recipe?
A5: Most stovetop and electric pressure cookers work well. Just make sure your cooker can hold a cake pan or heat-safe dish without touching the bottom. Using a trivet or stand inside the cooker helps prevent direct heat contact,ensuring even cooking.
Q6: How do I avoid overcooking or undercooking the cake?
A6: Timing is crucial-generally, 25 to 30 minutes at high pressure does the trick. Use natural pressure release to allow gradual cooling and setting of the cake.Always conduct the toothpick test: insert it in the center, and if it comes out clean, your cake is ready!
Q7: Any tips for decorating a pressure cooker Red Velvet Cake?
A7: Go classic with a rich cream cheese frosting for that velvety contrast. As the cake is moist, the frosting will adhere beautifully. Chill the cake slightly before frosting to prevent melting, and consider garnishing with crushed nuts or fresh berries for a creative twist.
Q8: Can I make this recipe vegan or dairy-free?
A8: Absolutely! Replace buttermilk with almond milk combined with a splash of lemon juice or vinegar, and substitute eggs with flax eggs or applesauce. Use dairy-free cream cheese for frosting, and you’ll have a vegan-friendly, fluffy delight just as luscious as the original.
Q9: What’s the best way to store leftover pressure cooker Red velvet Cake?
A9: Wrap it tightly with plastic wrap or store in an airtight container. Keep it refrigerated if frosted, as cream cheese frosting needs to stay cool. For longer storage, freezing works well-just thaw overnight in the fridge before serving.
Q10: Is the red color from food coloring safe when using pressure cooking?
A10: Yes! Quality red food coloring holds up well under pressure cooking conditions. For a more natural approach,alternatives like beet juice powder can be used,though the color might potentially be more subtle. Choose what fits your preference and dietary needs.
Closing Remarks
Whether you’re racing against the clock or simply craving a slice of moist, velvety red velvet cake, mastering this pressure cooker recipe opens up a world of quick and fluffy indulgence. With just a few simple steps and a trusty pressure cooker by your side, you can whip up a stunning dessert that rivals traditional oven-baked cakes-minus the wait.So, gather your ingredients, embrace the magic of steam, and let your taste buds revel in the rich, vibrant flavors of this speedy red velvet masterpiece.Happy baking, and may every slice be delightfully decadent!